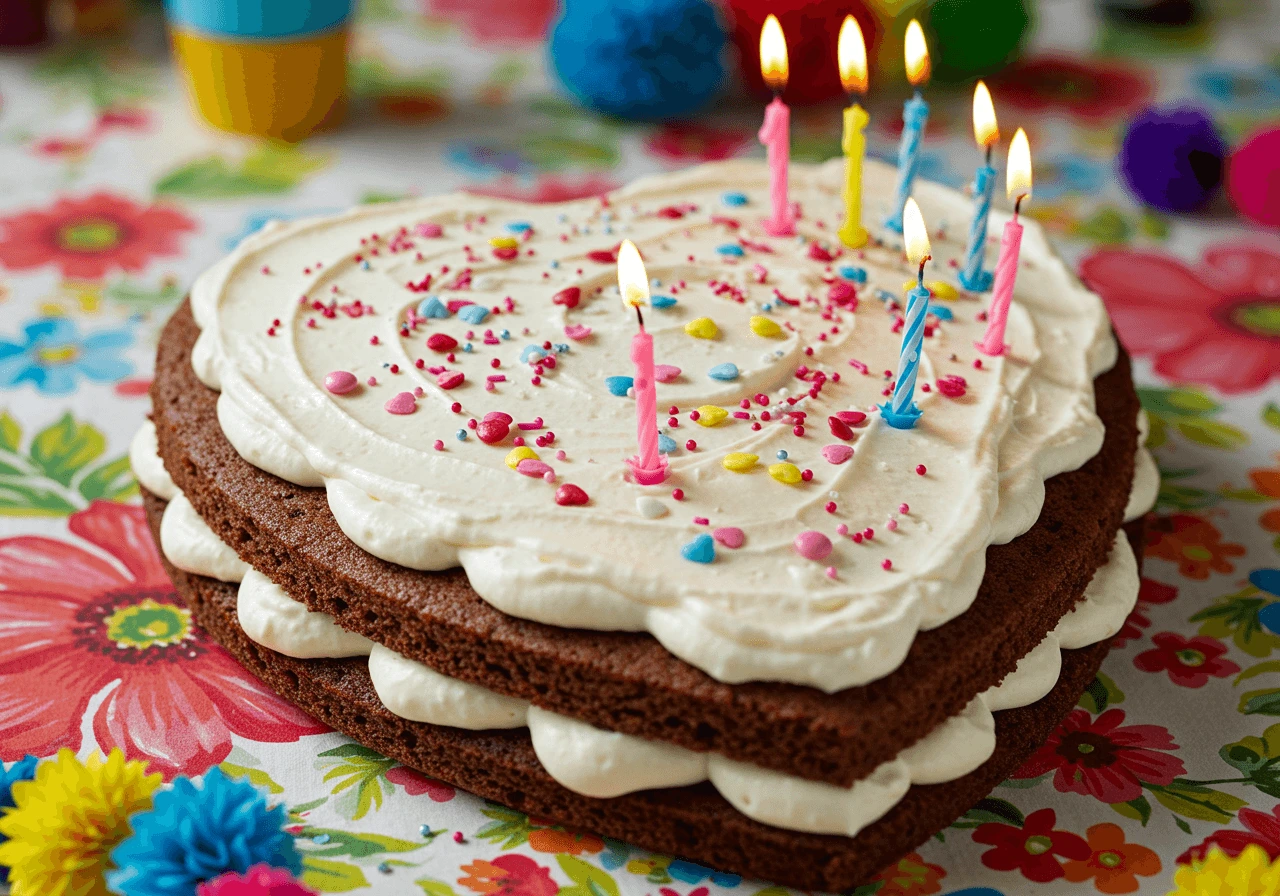
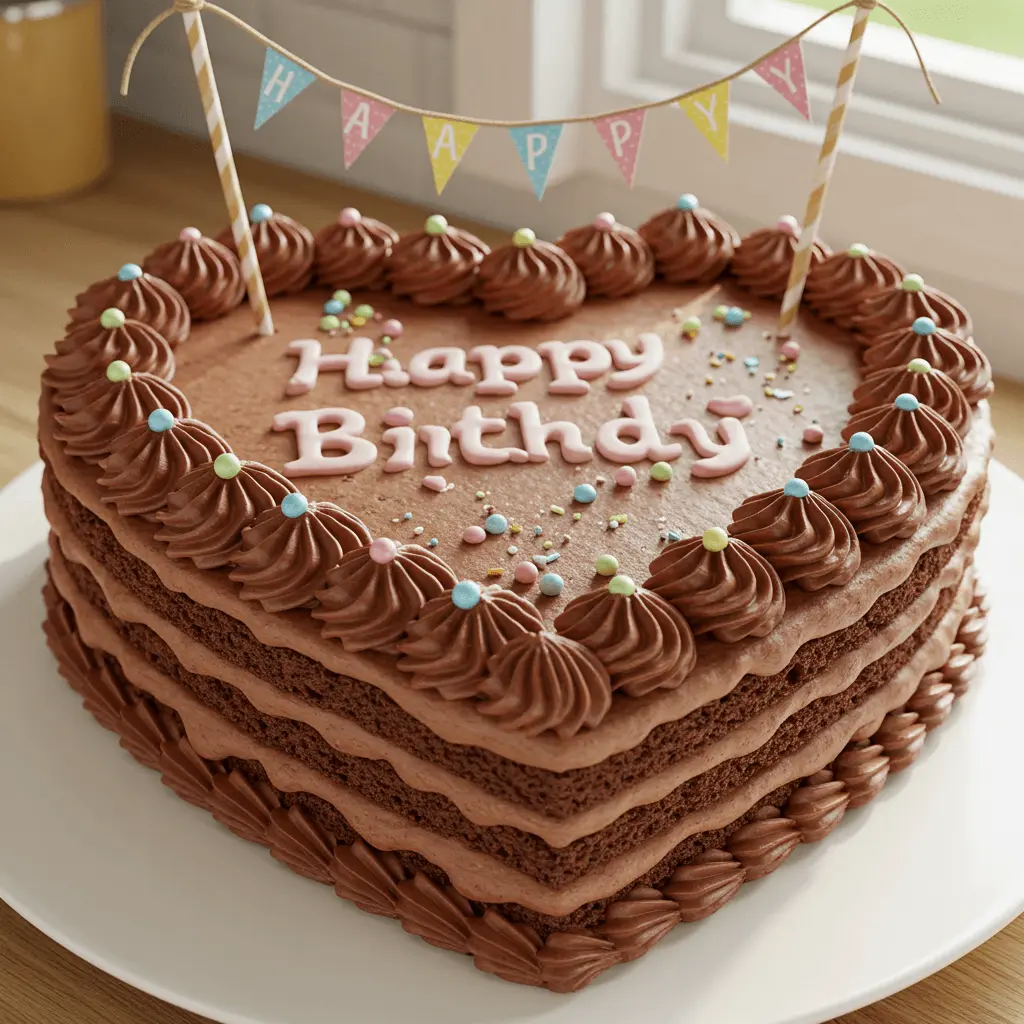
How to Make the Perfect Heart Birthday Cake: A Step-by-Step Guide
Table of Contents
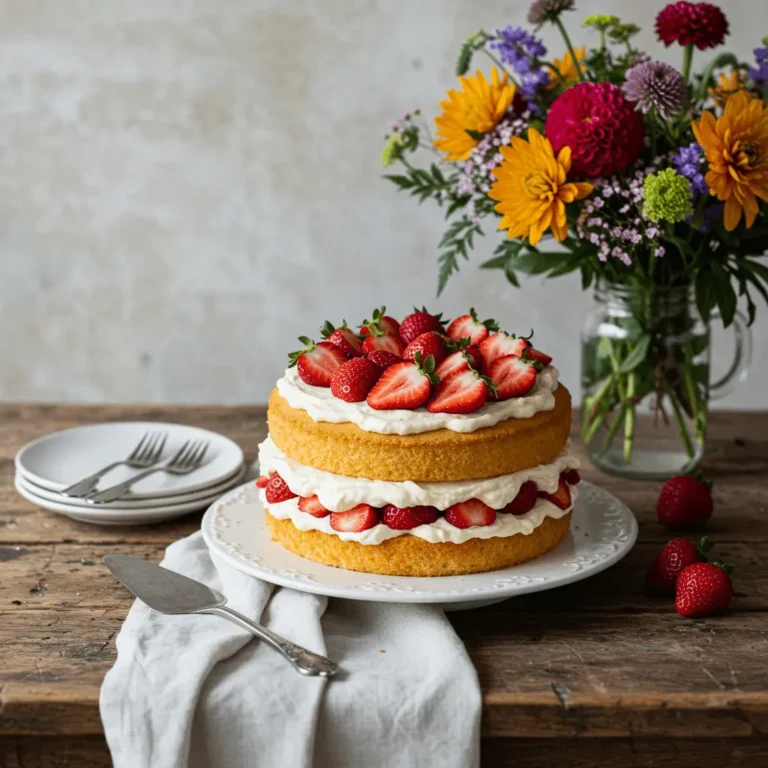
A heart birthday cake is more than just a sweet treat—it’s a heartfelt symbol of love and celebration. Whether you’re planning a birthday for a loved one or want to add a personal touch to a party, a heart-shaped cake is the perfect way to show you care. The unique shape and vibrant decorations make it an ideal centerpiece, bringing a little extra charm to any occasion. From simple buttercream designs to intricate fondant decorations, a heart birthday cake can be customized to fit any theme or personality. In this guide, we’ll walk you through the step-by-step process of making the perfect heart-shaped birthday cake, ensuring your creation is as delightful to the eyes as it is to the taste buds. Let’s get started!
Essential Ingredients & Tools for a Heart Birthday Cake
Key Ingredients for a Delicious Heart-Shaped Cake
To make the perfect heart-shaped birthday cake, the right ingredients are essential for achieving the perfect texture, flavor, and overall appearance. Each ingredient plays a critical role in creating a cake that’s soft, moist, and delicious. Here’s a closer look at the key ingredients you’ll need:
1. Cake Flour
Using cake flour instead of all-purpose flour will give your heart-shaped cake a lighter, more delicate texture. Cake flour has a lower protein content, which helps produce a finer crumb and a soft, airy cake. If you don’t have cake flour, you can substitute it with all-purpose flour and cornstarch in a pinch, though the texture might not be as light.
2. Sugar
Granulated sugar is essential for sweetness and structure. It helps create a tender crumb and adds moisture to the cake. You can also use other sweeteners like brown sugar or coconut sugar for a slightly different flavor, but keep in mind that this may change the texture and color of your cake.
3. Eggs
Eggs are critical in binding the ingredients together while adding moisture and structure to the cake. They help the cake rise by trapping air during mixing, which gives the cake its fluffy consistency. For the best results, use room temperature eggs to ensure even mixing and smooth batter.
4. Unsalted Butter
Unsalted butter is preferred because it allows you to control the amount of salt in your recipe. The butter adds richness and moisture to the cake, ensuring that it’s soft and tender. Make sure the butter is softened before mixing—this helps it cream properly with the sugar for a smooth batter.
5. Vanilla Extract
A splash of pure vanilla extract brings out the natural sweetness of the cake and enhances the flavor profile. You can also experiment with other extracts like almond or lemon for a unique twist on the classic flavor.
6. Baking Powder
Baking powder is the leavening agent that helps the cake rise and become light and fluffy. Be sure to measure it accurately, as too much or too little can affect the texture of the cake.
7. Whole Milk
Milk is essential for the proper consistency of the batter. Whole milk adds moisture and helps dissolve the dry ingredients. You can also substitute with other milk alternatives like almond or soy milk, though this may alter the flavor and texture slightly.
8. Food Coloring (Optional)
For a visually appealing heart-shaped birthday cake, you can use food coloring to tint your frosting or cake layers. This step is especially important if you want to make a cake with vibrant or pastel shades that fit the theme of the birthday party. Gel food coloring works best as it won’t alter the consistency of your cake or frosting.
By using these key ingredients in the right proportions, you’ll be well on your way to baking a heart-shaped cake that’s not only beautiful but also delicious. Each ingredient plays a crucial role in creating a soft, flavorful cake that will be the star of the celebration!
The Best Tools to Use for Baking & Decorating
Creating a perfect heart birthday cake requires the right tools to ensure both the baking process and decoration come out flawless. Using the best tools will not only make the process easier but also help achieve professional-looking results. Here’s a breakdown of the essential tools you’ll need to bake and decorate your heart-shaped cake:
1. Heart-Shaped Cake Pan
A heart-shaped cake pan is the most important tool for creating a perfectly shaped heart cake. These pans come in various sizes, and it’s essential to choose the right size depending on the number of servings you need. Make sure to grease and flour the pan to ensure the cake comes out easily after baking. A non-stick heart-shaped pan is especially helpful for a smooth release.
2. Electric Mixer or Hand Mixer
While mixing the cake batter by hand is possible, an electric mixer (either a stand mixer or a hand mixer) ensures a smooth, lump-free batter. This tool is crucial for incorporating air into your batter, which results in a light and fluffy cake. A hand mixer is more affordable and portable, while a stand mixer offers more power and versatility if you bake often.
3. Piping Bags and Tips
Piping bags and tips are essential for adding beautiful frosting details to your heart birthday cake. Piping bags allow you to control the flow of frosting, creating intricate designs like rosettes, borders, and even lettering. For heart-shaped cakes, popular tips to have on hand include:
- Star tips for creating rosettes and textured designs.
- Round tips for writing or outlining.
- Leaf tips for delicate flourishes like leaves or other decorative touches.
Invest in reusable piping bags for sustainability and easy cleanup.
4. Offset Spatula
An offset spatula is one of the most useful tools for frosting your heart cake smoothly and evenly. The slight curve allows you to easily spread frosting on the cake without disturbing the layers or leaving streaks. It’s also perfect for creating a flawless top layer and smoothing the sides of your cake for a polished look.
5. Cake Turntable
A cake turntable is an excellent tool for decorating your heart birthday cake. It allows you to rotate the cake smoothly as you apply frosting or decorations, giving you better control and precision. This makes it easier to apply even layers of frosting, particularly when you’re trying to create smooth or piped designs.
6. Food Coloring
To make your heart cake more festive, food coloring is a must. Gel food colors are ideal because they produce vibrant hues without altering the consistency of your frosting. Whether you’re going for a soft pastel theme or bold, bright colors, food coloring allows you to customize your heart birthday cake to match the party theme or the birthday person’s favorite colors.
7. Cake Leveler or Serrated Knife
A cake leveler is a handy tool for ensuring that your cake layers are flat and even. If you don’t have one, a serrated knife can do the job just as well. By leveling the cake, you prevent the frosting from sliding off uneven surfaces and create a clean base for stacking and frosting your layers.
8. Edible Decorations
To really make your heart-shaped birthday cake stand out, edible decorations like sprinkles, edible glitter, pearls, and fondant cutouts are great options. These can add a touch of elegance or fun to your cake, depending on the theme of the birthday celebration. Fondant cutters can help you create themed decorations like flowers, stars, or even personalized messages to make the cake truly unique.
9. Cooling Rack
Before you start decorating, make sure your heart-shaped cake layers are fully cooled. A cooling rack is essential because it allows air to circulate around the cake, preventing it from becoming soggy. Cooling your cake completely is critical before applying any frosting or fondant, as warm cakes can cause melting or uneven frosting.
Bonus Tools: Cake Stencils & Cake Smoother
For added flair, consider using cake stencils to create intricate designs or patterns on your cake, or use a cake smoother to achieve a flawless, polished finish. These tools are especially helpful when decorating cakes with fondant or achieving smooth buttercream finishes.
By having these essential tools in your kitchen, you’ll set yourself up for success in both baking and decorating your heart birthday cake. The right tools allow you to take your cake-making to the next level and ensure that your heart-shaped cake is both delicious and beautiful!
Choosing the Right Frosting for Your Heart Birthday Cake
When it comes to creating a beautiful and delicious heart birthday cake, the frosting plays a crucial role in both the aesthetics and flavor of the cake. The right frosting can elevate your cake’s design and enhance its overall taste, while the wrong choice might hinder its appeal or make decorating a bit tricky. Let’s explore some of the best frosting options for your heart-shaped masterpiece and how to choose the one that fits your needs.
Buttercream Frosting: A Classic Choice
Buttercream frosting is a go-to option for heart-shaped cakes, thanks to its creamy texture and versatility. It can be piped into intricate designs such as rosettes, borders, or even smooth, flawless finishes. Buttercream is also easy to color, making it ideal for themed cakes or adding pastel shades to your heart cake. One of the best things about buttercream is that it can be flavored to suit your cake, from vanilla and chocolate to more exotic flavors like strawberry or coffee. Additionally, it’s sturdy enough to support any decorations you add, such as edible pearls, sprinkles, or fondant decorations.
Whipped Cream Frosting: Light and Airy
If you want a lighter, fluffier alternative to buttercream, whipped cream frosting is an excellent choice. It has a delicate texture that pairs well with lighter cakes, such as sponge or angel food cake. The frosting can also be sweetened and flavored to suit your tastes, but it’s important to note that whipped cream doesn’t hold its shape as well as buttercream, especially in warmer temperatures. If you’re planning a cake for a party in a warm room or outdoor setting, whipped cream might not be the best option as it could begin to melt or deflate. However, for a soft, airy look, whipped cream is perfect, especially if you’re opting for a minimalist design.
Fondant: Smooth and Sleek
For those seeking a smooth, polished finish, fondant is the way to go. Fondant is a sugar-based paste that’s rolled out and draped over the cake to create a flawless, smooth surface. It’s ideal for intricate, precise designs and can be molded into flowers, bows, or other decorative shapes. Fondant is often used for more elaborate, high-end cakes because of its sophisticated look. However, it tends to be sweeter than buttercream and has a chewy texture, which some people might not prefer. Fondant is best suited for cakes that need to maintain their shape and be on display for a long period, as it holds up well under various conditions.
Cream Cheese Frosting: For a Tangy Twist
Cream cheese frosting offers a deliciously tangy and rich flavor, making it a great option for heart-shaped cakes that need a bit of contrast. This frosting is particularly popular for cakes like carrot cake, red velvet, or banana cake, as its slight tang complements these flavors beautifully. Cream cheese frosting can also be piped or spread easily, making it another versatile choice for decorating your cake. However, because cream cheese frosting has a softer texture than buttercream, it may need to be chilled to hold its shape when decorating, especially if you’re planning to add intricate designs.
Royal Icing: For Detailed Designs
If you’re aiming for intricate detailing or want to add delicate accents to your heart-shaped birthday cake, royal icing might be the right choice. Royal icing is made from egg whites, powdered sugar, and lemon juice, and it dries hard, making it ideal for creating precise, detailed decorations like flowers, lace, or piping work. While it doesn’t have the same creamy taste as buttercream or cream cheese frosting, royal icing allows for stunning designs that are perfect for a visually striking cake.
Tips for Choosing the Right Frosting:
- Consider the Cake Type: Lighter cakes like sponge or angel food work well with whipped cream, while denser cakes like chocolate or vanilla pair nicely with buttercream or cream cheese frosting.
- Weather Considerations: If your birthday celebration is outdoors or in a warm environment, buttercream or fondant might be more reliable as they hold up better in heat.
- Flavor Preferences: Think about the flavor profile of your cake and choose a frosting that complements or contrasts well with the cake’s taste.
- Decoration Style: For smooth, polished cakes, fondant is your best bet, while buttercream is more flexible for various decoration styles.
Step-by-Step Guide to Making the Perfect Heart Birthday Cake
Mixing & Baking the Cake Layers
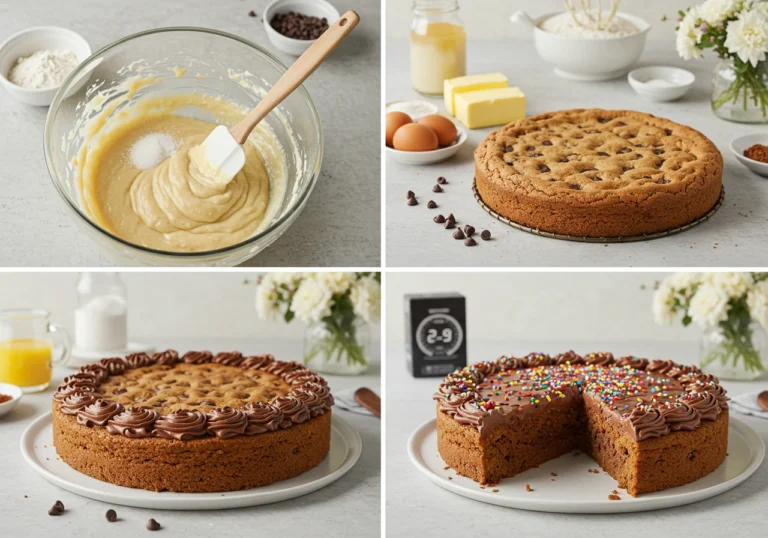
Mixing and baking the cake layers is one of the most crucial steps in creating the perfect heart-shaped birthday cake. The texture and consistency of your cake layers will lay the foundation for how your final cake will look and taste. Here’s a more detailed look at how to make sure your cake layers turn out light, fluffy, and perfectly shaped.
1. Preparing Your Ingredients
Begin by collecting all your ingredients and letting them come to room temperature. This is important because ingredients like butter and eggs blend more smoothly and evenly at room temperature, leading to a better cake texture. You’ll need:
- Cake flour (for a soft, tender crumb)
- Sugar (to sweeten the cake and help with texture)
- Butter (for moisture and richness)
- Eggs (to bind the ingredients and provide structure)
- Baking powder (for lift and lightness)
- Milk (to bring everything together)
Make sure to sift the flour and baking powder together to avoid any clumps and to ensure even distribution throughout the batter.
2. Mixing the Ingredients
Begin by beating the butter and sugar together until the mixture is light and fluffy. This process incorporates air into the mixture, helping the cake rise during baking. Next, add in the eggs one at a time, making sure each egg is fully mixed in before adding the next. The egg mixture should be smooth and slightly thickened.
Now, gradually add the sifted dry ingredients (flour, baking powder) into the butter and sugar mixture, alternating with the milk. This helps prevent overmixing, which can make the cake dense. Mix until just combined. Avoid overmixing, as it can result in a dense cake—mix gently.
If you’re adding any flavorings, such as vanilla extract, or food coloring to customize your heart cake, add them at this stage and mix them in gently.
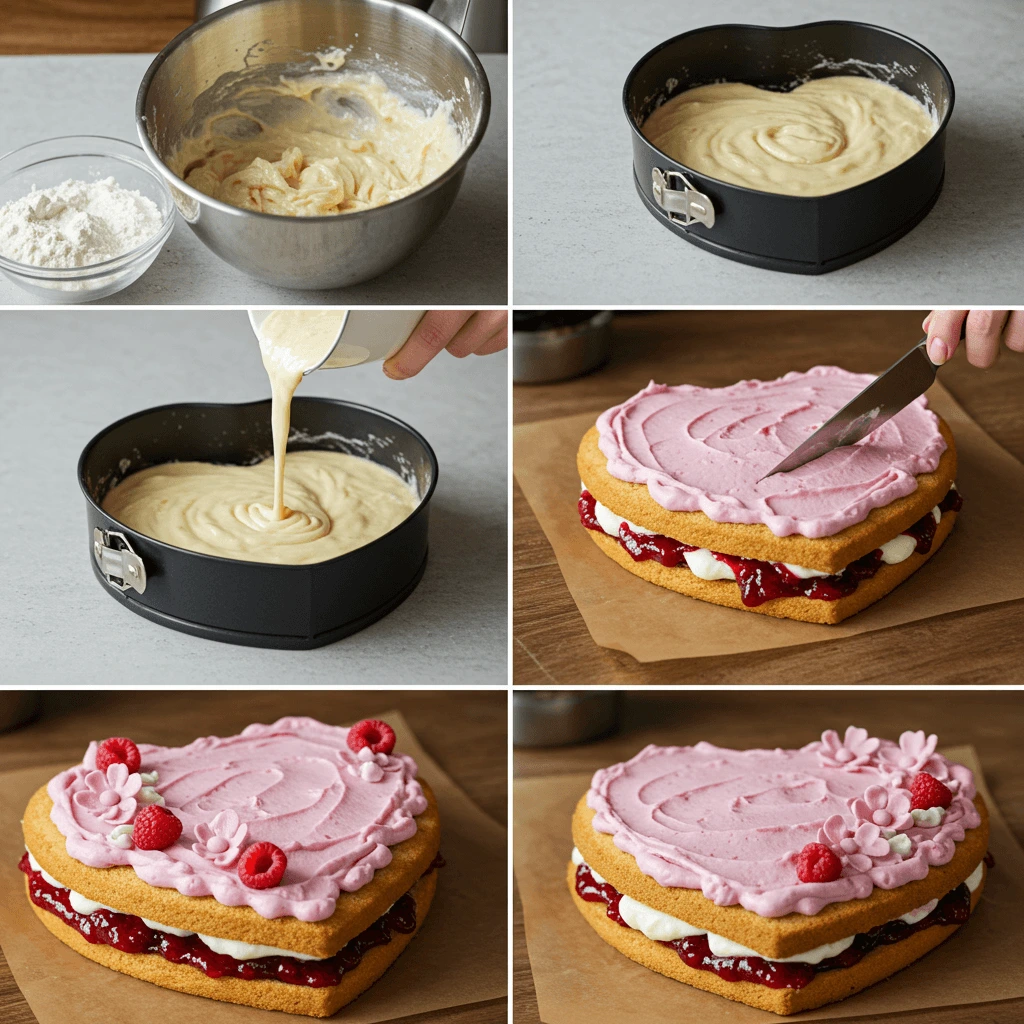
3. Preparing the Heart-Shaped Pan
To ensure your heart-shaped cake comes out of the pan easily, grease the pan with butter or non-stick spray, and dust it lightly with flour. You can also line the pan with parchment paper for extra security. The heart-shaped pan can be tricky, so make sure the batter is evenly spread to the edges, especially in the corners, to maintain the heart shape during baking.
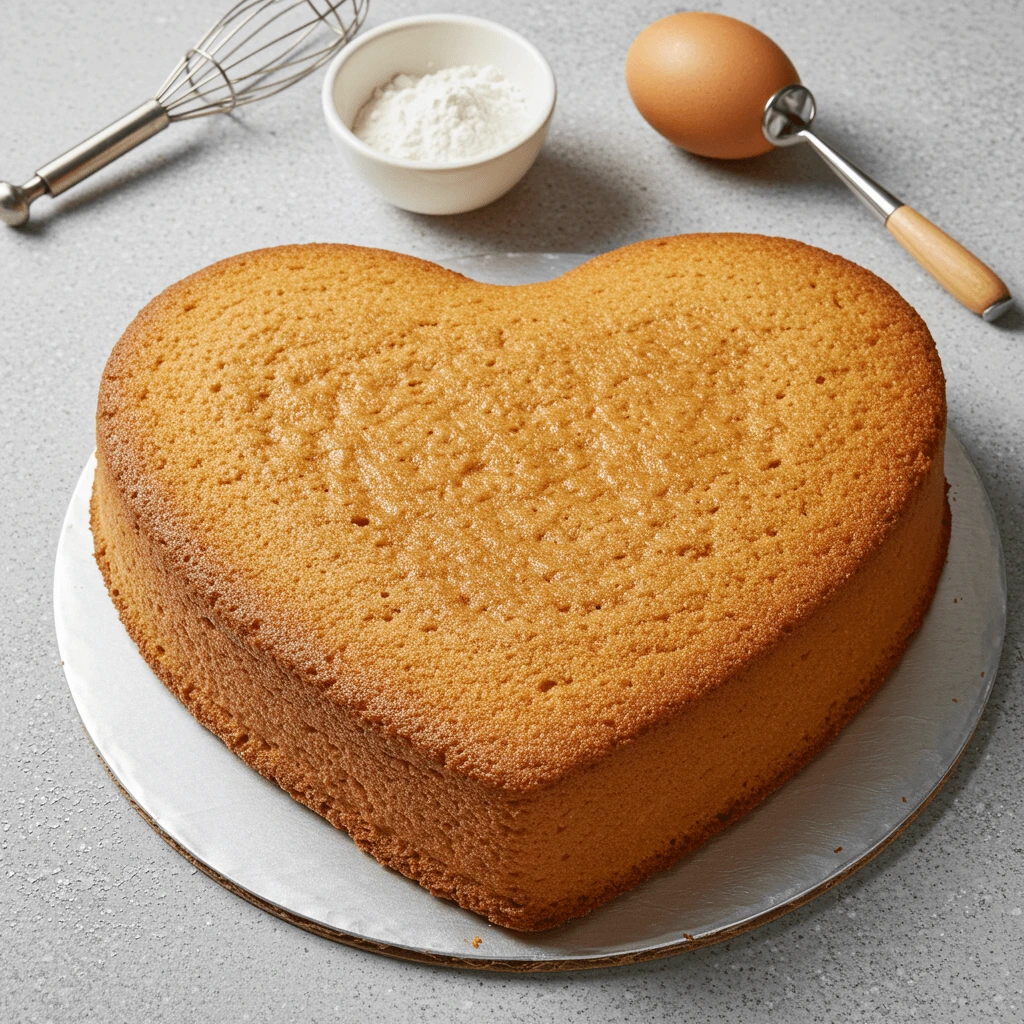
4. Baking the Cake Layers
Preheat your oven to 350°F (175°C). Once the cake batter is ready and your pan is prepared, pour the batter into the heart-shaped pan, smoothing the top with a spatula. Be careful not to overfill the pan—leave about an inch of space at the top to allow the cake to rise without overflowing.
Bake the cake for 25-35 minutes, depending on the size of your pan and the thickness of the layers. To check if it’s done, insert a toothpick or cake tester into the center of the cake.If the toothpick comes out clean or with just a few moist crumbs, your cake is done.
5. Cooling the Cake Layers
Once your heart-shaped cake layers are baked to perfection, remove the pan from the oven and let it cool in the pan for 10-15 minutes. Next, gently take the cake out of the pan and transfer it to a wire rack to cool thoroughly. This step is crucial because if you try to frost the cake while it’s still warm, the frosting will melt and slide off, creating a mess.
By following these steps, you’ll ensure that your heart-shaped cake layers are light, fluffy, and perfectly shaped for your birthday celebration. The mixing and baking process sets the stage for your creative decorating, so don’t rush it—take your time to get it just right!
Assembling and Layering the Cake
Assembling and layering your heart-shaped birthday cake is one of the most crucial steps in creating a perfectly structured cake that looks as good as it tastes. This is where the foundation of your design is built, so it’s important to follow a few tips to ensure your layers come together seamlessly.
- Start with a Solid Base
Before you even think about frosting or decorating, you need to make sure your cake layers are fully cooled. If your cake is still warm, the frosting will melt and slide off, ruining your hard work. Let each layer cool completely on a wire rack to avoid this issue. Cooling also helps to set the cake’s shape, especially when you’re working with a heart-shaped pan. - Trim for Even Layers
If your cake layers have domed or uneven tops from baking, use a serrated knife to trim them flat. This will help the layers stack evenly, making it easier to frost. A level cake also ensures a more professional look when decorated. Depending on how thick you want your cake, you can even slice each layer in half to create more layers, resulting in a taller and more intricate finished product. - Add a Layer of Frosting Between the Cake Layers
Once your layers are level, spread a thin layer of frosting on top of the bottom cake layer. This acts as a “glue,” helping to hold the layers together and providing a smooth base for the next layer. Use a frosting spatula or an offset spatula for even coverage. If you’re using flavored fillings, such as jam or cream, now is the time to spread it generously but avoid overstuffing, which could make the layers slide. - Stacking the Layers
Place the second cake layer carefully on top of the first, ensuring that it is centered. Gently press down to secure it. If you’ve sliced your cake into multiple thinner layers, repeat this process, spreading frosting between each layer, making sure the edges are aligned. For a heart-shaped cake, ensure that each layer is positioned symmetrically so the shape remains uniform as you build upward. - Crumb Coat for Clean Frosting
To avoid crumbs ruining your final layer of frosting, spread a thin “crumb coat” of frosting over the entire cake first. This step helps seal in any crumbs and provides a smooth surface for the final layer of frosting. Once applied, chill the cake for 20-30 minutes to let the crumb coat set before adding the final layer of frosting. - Final Layer and Smooth Finish
Once your crumb coat is set, spread a thicker layer of frosting over the cake. You can choose to keep the frosting smooth with a spatula, or go for a textured look using different decorating tools. Take your time here—this is the outermost layer that your guests will see, so make sure it’s even and beautifully finished. Don’t forget to frost the sides of the heart-shaped cake as well to maintain a cohesive look.
How to Frost and Decorate Your Heart Birthday Cake
Frosting and decorating a heart birthday cake is where the magic truly happens. With the right techniques, you can transform your cake into a beautiful work of art, personalized for the birthday celebration. Here’s how to do it step-by-step:
1. Choose the Right Frosting
The first step in decorating your heart birthday cake is choosing the right frosting. Buttercream is a popular choice due to its smooth texture and versatility. It’s easy to pipe into intricate designs like rosettes, borders, and even cursive writing. For a more polished, sleek look, you can opt for fondant, which gives a smooth, professional finish, though it may take more effort to apply. Additionally, if you want a lighter, fluffier texture, whipped cream or cream cheese frosting can also be used, depending on your preference.
2. Frosting the Cake
Start by applying a thin layer of frosting, known as a crumb coat, all over the cake. This layer helps to seal in any crumbs and create a smooth surface for the final layer of frosting. Once the crumb coat is applied, refrigerate the cake for about 20-30 minutes to firm it up. Afterward, apply the final thick layer of frosting, making sure to spread it evenly over the top and sides of the cake. For a smooth finish, use a bench scraper or a flat spatula to even out the frosting.
3. Creating Simple Piping Designs
Once the cake is frosted, it’s time to get creative! Use a piping bag fitted with different tips to create decorative designs. Common techniques for heart-shaped birthday cakes include:
- Rosettes: Piping buttercream in a swirl motion to create a beautiful, textured look on the cake.
- Shell borders: A classic piping technique that creates a scalloped edge, ideal for adding a touch of elegance.
- Cursive writing: You can write a special birthday message or name using a fine tip.
4. Adding Color and Texture
Color can make your cake stand out and reflect the personality of the birthday celebrant. Food coloring can be mixed into your frosting for vibrant hues or even pastel tones. You could try an ombre effect, where the frosting fades from a darker color at the bottom to a lighter shade at the top, or create bold patterns with contrasting colors.
If you’re feeling adventurous, consider texturing the frosting using a comb tool to create a fun, striped effect or delicate waves. You can even make a fondant bow or add a few edible pearls to enhance the look further.
5. Adding Edible Decorations and Toppings
Edible decorations are an excellent way to bring extra charm to your heart birthday cake. Options include:
- Add edible glitter or sprinkles for a bit of sparkle.
- Sugar flowers or fondant shapes to give your cake a theme, like roses for a romantic touch or stars for a celebratory look.
- Fresh fruit such as berries or thinly sliced fruit like strawberries or kiwis for a fresh, natural finish.
- Chocolate shavings or small chocolate hearts to complement the overall theme.
6. The Final Touches
Finish your cake by adding a personal flair. You can dust it with powdered sugar for a soft, elegant finish, or place a few candles on top for that classic birthday touch. If you’re feeling playful, you might add some themed cake toppers like a mini figurine or a small banner that says “Happy Birthday.”
Creative Heart Birthday Cake Decorating Ideas
Simple Yet Elegant Heart Cake Designs
When it comes to heart birthday cakes, simplicity often creates the most stunning and elegant designs. You don’t need to overcomplicate things with too many decorations. In fact, a minimalist approach can allow the beauty of the cake’s shape and colors to truly shine. Here are a few ideas for creating simple yet elegant heart cake designs that will impress your guests:
1. Smooth Buttercream Finish
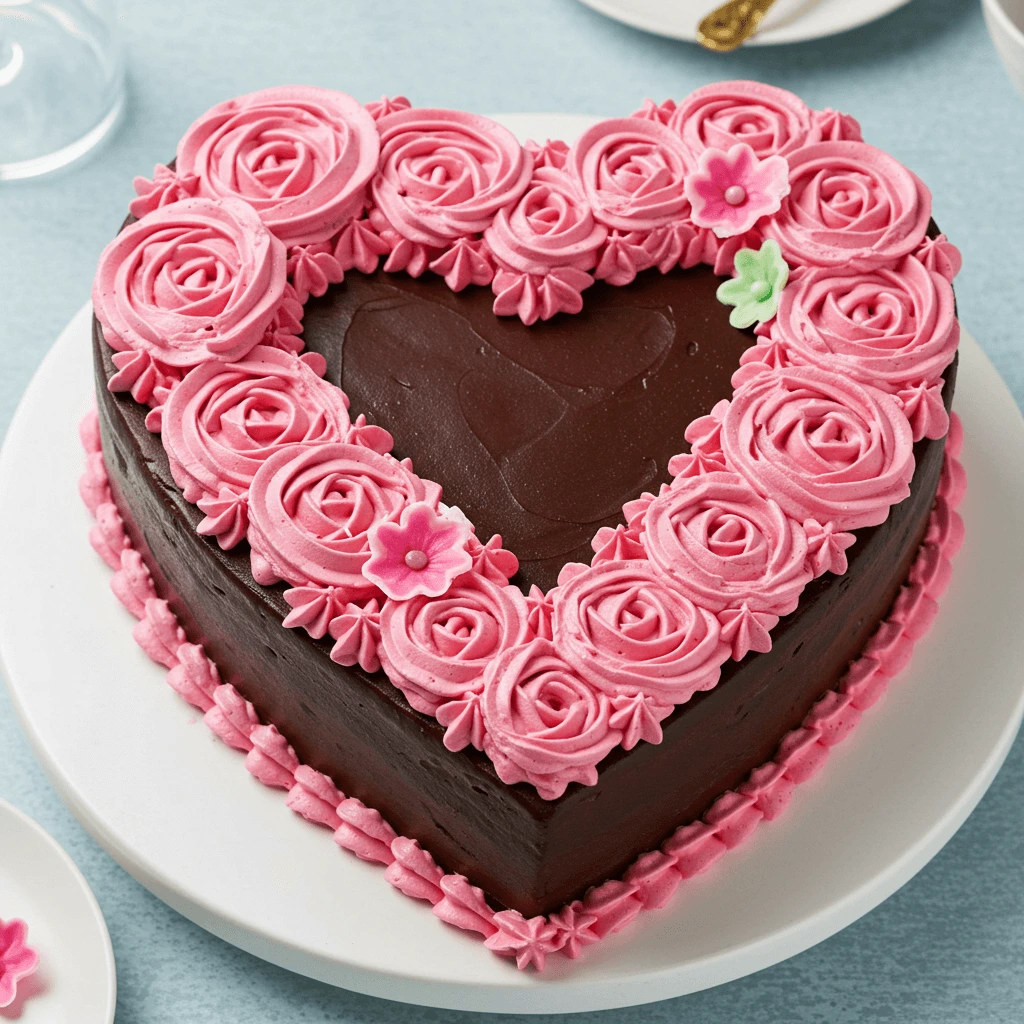
A smooth, perfectly frosted heart-shaped cake can be a showstopper in its simplicity. The key is to apply a thin layer of buttercream and use a spatula or bench scraper to smooth out the surface for a flawless finish. You can keep the buttercream in classic shades—soft pastels like pale pink, lavender, or mint green—or go for a bold statement with deep red or gold accents. This clean look gives the cake a refined, polished appearance without overwhelming the design.
2. Piped Rosettes or Borders
Another elegant touch is creating buttercream rosettes around the edges of the heart. These rosettes are simple to pipe but look impressive when used to frame the cake or create a border around the cake’s base. You can alternate between a few different pastel shades to add depth or stick to a single tone for a more uniform look. A simple piping technique like shell borders along the sides can also add a decorative yet refined edge to the cake.
3. Minimalist Accents: Edible Pearls and Glitter
Adding delicate accents, such as edible pearls or light dustings of edible glitter, can elevate the overall aesthetic. These tiny details provide a subtle touch of luxury without taking away from the cake’s simplicity. Sprinkle a few pearls along the edges, in the center, or down the sides for a soft, sophisticated look. A light dusting of edible gold or silver glitter can add just the right amount of sparkle to give the cake a festive yet understated feel.
4. Elegant Color Palette
For a truly elegant design, consider sticking to a limited color palette. Soft, muted tones like blush pink, creamy white, or pale peach convey a sense of sophistication. For a more contemporary feel, you could use a monochromatic palette with shades of the same color—think varying tones of pink or red for a chic, modern approach. These colors, when paired with simple designs, can make the heart-shaped cake look effortlessly beautiful and luxurious.
5. Naked Heart Cake
A “naked” cake has become quite trendy for its simple, rustic elegance. By leaving parts of the cake exposed, with just a light coating of frosting, this design allows the cake layers to peek through, adding texture and a homemade charm. A naked heart cake can be adorned with fresh flowers, berries, or a few strategically placed sprigs of greenery for a natural, understated elegance.
These simple yet elegant heart cake designs show that sometimes less truly is more. By focusing on clean lines, soft colors, and a few special touches, you can create a heart-shaped cake that is beautiful, stylish, and perfect for any birthday celebration.
Adding Special Touches with Edible Decorations
When it comes to decorating a heart birthday cake, the details matter. Adding edible decorations can elevate the overall look of your cake, transforming it from a simple dessert into a work of art. Whether you’re going for a subtle, elegant design or something bold and colorful, there are plenty of creative ways to personalize your heart-shaped cake using edible elements. Here are a few ideas to inspire you as you begin:
1. Edible Flowers
Edible flowers, such as pansies, violets, and marigolds, are a beautiful and natural way to decorate your cake. Their delicate petals add a pop of color and elegance. You can arrange them on top of the cake or place them along the edges for a softer look. Just make sure the flowers you choose are safe for consumption.
2. Sprinkles and Glitter
Sprinkles are a fun and easy way to add texture and color to your heart birthday cake. You can opt for colorful rainbow sprinkles for a playful vibe, or go for gold or silver edible glitter for a more sophisticated look. Lightly dusting the top of your cake with edible glitter will give it a magical sparkle that’s perfect for any celebration.
3. Edible Pearls and Beads
Edible pearls and beads are great for creating a refined and luxurious effect. These tiny decorations can be used to form elegant borders along the cake’s edges, or they can be scattered across the top for a more scattered, whimsical look. Choose pearl colors that complement the theme of your party—soft pastels for a delicate touch or metallic tones for added glamour.
4. Fondant Decorations
Fondant allows for detailed designs that add a polished, professional look to your cake. You can roll out fondant to create intricate shapes, such as tiny hearts, flowers, or letters. Fondant can also be used to cover the entire cake for a smooth, clean appearance, giving it a more sophisticated finish.
5. Piped Buttercream Flowers
Piped buttercream flowers are another wonderful way to decorate your heart birthday cake. With just a few basic piping tips, you can create rosettes, flowers, and borders that give the cake texture and visual interest. You can color the buttercream to match the party’s theme or go with soft pastel shades for a romantic, vintage feel.
6. Chocolate Decorations
For those with a love for chocolate, using chocolate decorations can add a rich, indulgent flair to your cake. You can create chocolate curls, shavings, or even melt chocolate to form hearts or other shapes to decorate the cake’s surface. Dark, milk, or white chocolate can all be used to complement your frosting and add flavor to the cake.
7. Personalized Edible Images
If you’re looking for a unique touch, consider adding personalized edible images to your heart birthday cake. You can print images of the birthday person’s favorite things, a meaningful quote, or even a photo of them onto edible paper using edible ink. This is a fun way to make the cake even more special and personal.
Customizing Your Cake with Food Coloring and Themes
One of the most exciting aspects of making a heart birthday cake is the opportunity to customize it with vibrant food coloring and themes that reflect the personality of the birthday celebrant or the occasion. Whether you’re going for a romantic, fun, or whimsical look, there are endless possibilities to get creative with colors and themes.
Using Food Coloring for a Personalized Touch
Food coloring can completely transform the appearance of your cake, allowing you to create beautiful, bold, or soft hues that match the celebration. Here are a few ideas for using food coloring:
- Pastel Shades: Soft, pastel tones like light pink, lavender, or baby blue are perfect for creating a dreamy, elegant vibe. These colors work beautifully with buttercream or royal icing and give your heart cake a soft, romantic feel, ideal for a Valentine’s Day or anniversary celebration.
- Bold Colors: For a more vibrant and energetic birthday celebration, consider using bright, bold colors like red, turquoise, or yellow. These colors can create a lively and fun atmosphere, making the cake the focal point of the party.
- Ombre Effects: Achieving an ombre effect is a simple yet stunning way to enhance your cake. You can gradually transition between colors (like from light pink to dark red) or create a rainbow effect with multiple vibrant colors. This technique works great for making a cake look intricate without requiring complex decorating skills.
- Marbled Look: Swirling different colors together can create a beautiful marbled effect, adding depth and texture to your heart-shaped cake. It’s a subtle yet eye-catching way to add creativity to your design.
Choosing Themes That Reflect the Occasion
Customizing your heart birthday cake with a theme adds an extra layer of personalization, making it more memorable for the recipient. Here are a few popular themes to consider:
- Floral Theme: Add a touch of elegance to your heart cake by incorporating floral decorations. You can use edible flowers or pipe buttercream flowers in soft hues for a sophisticated, vintage-inspired look. This theme works wonderfully for spring or summer birthdays.
- Princess or Fairy Tale Theme: For a child’s birthday, a fairy tale or princess theme can make the heart-shaped cake even more magical. Think of pastel pinks, glitter, and fondant tiaras or butterflies to add charm and whimsy to the cake.
- Rustic or Boho Style: A rustic heart cake is ideal for a more laid-back birthday celebration. Use earthy tones like soft browns, whites, and creams with a touch of greenery (like mint leaves or rosemary sprigs). A rustic heart cake can be decorated with buttercream swirls, textured fondant, or even a woodsy vibe for an outdoor birthday party.
- Superhero Theme: For a fun twist, customize your heart cake with the birthday person’s favorite superhero colors and logos. Bold reds, blues, and yellows with fun designs or toppers can make a heart-shaped cake fit for a superhero lover’s celebration.
Incorporating Special Details
Don’t forget about the small details that make a cake truly unique! Here are some ways to incorporate them:
- Edible Glitter or Sprinkles: A little sparkle can go a long way! Edible glitter or fun sprinkles (hearts, stars, or confetti) can make your heart-shaped birthday cake more playful and festive.
- Toppers: Cake toppers are a simple yet effective way to bring your theme to life. Consider using fondant figures, birthday candles, or customized cake toppers with the recipient’s name or age.
- Lettering and Piping: Adding a personalized message on the cake can make it even more special. You can pipe the birthday person’s name, age, or a simple “Happy Birthday” with frosting or even use edible markers for precise detailing.
By blending food coloring with themed decorations, you’ll create a heart birthday cake that’s both visually stunning and deeply meaningful. The key is to reflect the essence of the birthday celebration through thoughtful design choices that show off your creativity and attention to detail.
Common Mistakes to Avoid When Making a Heart Birthday Cake
Not Letting the Cake Cool Before Decorating
One of the most common mistakes when making a heart birthday cake is decorating the cake before it has fully cooled. It might seem tempting to start decorating right away, especially if you’re excited to see the final result, but this step is crucial for achieving a flawless finish.
When a cake is still warm, it can cause the frosting or icing to melt, leading to a sloppy, uneven appearance. The heat from the cake can also cause your buttercream or fondant to lose its shape, resulting in a mess rather than a smooth, polished finish. Additionally, the warmth of the cake can cause it to collapse or shift, making it harder to achieve a stable and even structure.
Why patience is key:
- Prevents Melting Frosting: When a cake is too warm, your frosting will soften and may begin to melt. This can lead to smudges or uneven coverage, ruining the sharp, clean lines that make your heart-shaped cake look professional.
- Maintains the Cake’s Shape: A cake that’s still warm might be more fragile, especially around the edges. Allowing it to cool ensures that it holds its shape as you stack the layers or apply frosting. If you rush this process, you may end up with a lopsided or uneven cake.
- Better for Layering and Filling: If you’re using fillings like jam, whipped cream, or fruit, it’s essential to let the cake cool before adding them. Warm cake can cause these fillings to melt or become too runny, ruining the texture and consistency you’re aiming for.
- Improved Frosting Finish: Once the cake is cool, it will provide a firmer base for the frosting, making it easier to achieve smooth, even layers. This is especially important for heart-shaped cakes, as the sharp edges and defined shape can be challenging to maintain if the cake is too warm.
To ensure the best results, let your cake cool on a wire rack for at least 15-20 minutes after it comes out of the oven. For a large cake, you may want to let it cool completely before you even think about frosting or decorating. This will give you a much smoother and more polished final result, ensuring your heart birthday cake is as beautiful as it is delicious.
Patience in this step truly makes all the difference in achieving that perfect, professionally decorated heart-shaped cake that everyone will admire!
Overloading with Decorations
When it comes to decorating a heart birthday cake, less is often more. While it might be tempting to pile on a variety of decorations, doing so can overwhelm the cake’s design and detract from its beauty. Overloading the cake with too many elements—such as excessive piping, too many edible decorations, or a cluttered color scheme—can result in a chaotic, busy appearance. Instead of making the cake look more exciting, it can make it appear overcomplicated and less elegant.
To create a balanced and visually appealing heart-shaped cake, focus on a few key design elements. For example, a delicate buttercream rosette border around the edges, a simple fondant heart on top, or a scattering of edible pearls can provide a polished, refined look. If you’re incorporating food coloring, consider sticking to a cohesive color palette, such as soft pastels or a subtle ombré effect, to keep the design feeling unified.
Additionally, giving the cake some breathing space by leaving areas with less decoration can make the decorative features pop even more. This will allow your heart-shaped cake to shine without feeling crowded, ensuring the design remains clean, eye-catching, and sophisticated.
Remember, the goal is to highlight the heart shape and the birthday celebration itself, not overwhelm it with unnecessary embellishments. A simple, well-thought-out design will always have a more lasting impact than one that tries to do too much.
Choosing the Wrong Cake Pan or Frosting
When it comes to making the perfect heart birthday cake, the right cake pan and frosting are essential for achieving the best results. Choosing the wrong ones can lead to structural issues or a less-than-appealing final appearance, but don’t worry—avoiding these mistakes is easier than you might think.
The Right Cake Pan:
Using the wrong cake pan for your heart-shaped cake can lead to uneven baking or a lack of definition in the shape. A heart-shaped cake pan is specifically designed to help you achieve that beautiful, symmetrical heart shape. It’s important to make sure you’re using a high-quality, non-stick heart-shaped pan to ensure the cake slides out easily without breaking apart. If you don’t have a heart-shaped pan, you can also create your own template using a round cake pan and carving the shape, but that takes a bit more skill.
Another consideration is the size of the pan. If your pan is too small, the batter will overflow, while a pan that’s too large might not give you the desired height or look. The right size heart-shaped pan should hold the amount of batter you’re using, usually about 8-10 inches in diameter for a cake that serves 8-10 people.
The Right Frosting:
Frosting plays a crucial role not only in flavor but in how well it stays on the cake. For a heart birthday cake, buttercream frosting is a popular choice because it’s easy to work with and can be used for both smooth surfaces and intricate designs. However, choosing the wrong frosting can lead to a cake that looks messy or doesn’t hold its shape.
Fondant, while smooth and picture-perfect, may not provide the same delicious flavor that buttercream does. It’s also harder to apply and can be tricky to get a smooth finish. If you’re aiming for a simple, homemade feel, buttercream is your best option. When choosing buttercream, you can adjust the consistency by adding more powdered sugar for a firmer texture or milk to make it more spreadable.
In addition to buttercream, some people prefer whipped cream for a lighter, fluffier texture. However, whipped cream is not ideal for intricate decorations since it doesn’t hold up as well as buttercream, especially in warmer weather.
The key is to choose a frosting that matches your vision and the kind of decoration you want to achieve. For instance, if you’re aiming for piped rosettes or intricate borders, buttercream will work best, while fondant might be better for a smooth, sleek finish.
Avoiding Common Mistakes:
- Under or over greasing the cake pan: If your pan is not well-greased or lined with parchment paper, your cake may stick, ruining the heart shape. On the other hand, too much oil or butter could cause uneven baking.
- Choosing a frosting that’s too thin or too thick: A frosting that’s too thin can run off the cake, while one that’s too thick will be difficult to spread smoothly.
- Ignoring temperature: Frosting is best applied when it’s at room temperature. Cold frosting can be difficult to spread, while warm frosting can melt and ruin the design.
By taking the time to choose the right cake pan and frosting for your heart-shaped birthday cake, you’ll ensure the cake bakes evenly, holds its shape, and looks beautiful for the celebration.
Conclusion
In conclusion, creating the perfect heart birthday cake is all about attention to detail—from selecting the right cake pan to choosing the ideal frosting. With the step-by-step guidance in this post, you now have the tools to bake and decorate a heart-shaped cake that will be both visually stunning and delicious. Whether you’re using a simple buttercream design or getting creative with edible decorations, your heart birthday cake will surely steal the spotlight at any celebration. Remember, the key to success is patience and practice, so don’t be afraid to experiment with different techniques until you perfect your creation. Happy baking, and don’t forget to share your beautiful heart-shaped cakes with us!