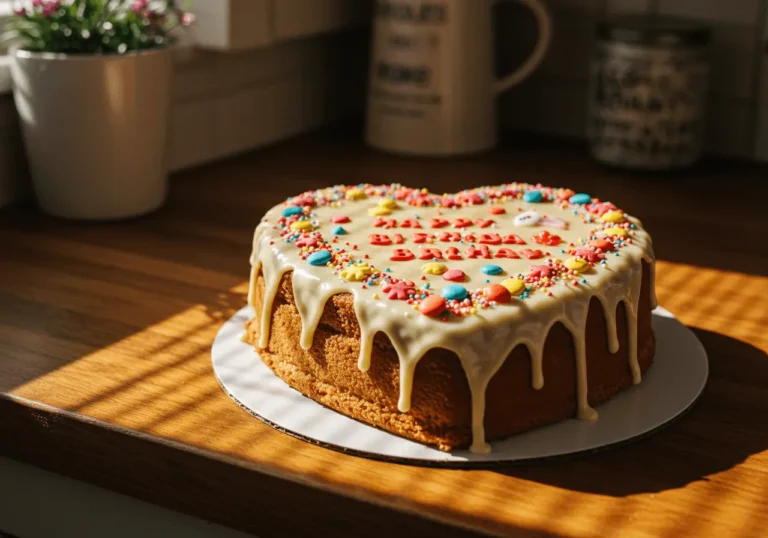
How to Make the Perfect Unicorn Cake: A Step-by-Step Guide
Table of Contents
If you’re looking to add a touch of magic to your next celebration, a Unicorn Cake is the perfect way to do it. With its vibrant colors, whimsical designs, and delicious layers, this cake has become a favorite for birthdays, parties, and special events. Whether you’re a seasoned baker or a first-timer, creating a perfect unicorn cake might seem like a challenge, but with the right guidance, you can craft a showstopping dessert which is just as enjoyable to create as it is to taste.
In this step-by-step guide, we’ll walk you through everything you need to know, from the cake layers to the frosting techniques, and of course, how to achieve the signature unicorn look with decorations like fondant horns and rainbow sprinkles. Get ready to create a cake that will leave everyone in awe and ensure your next party is filled with sweetness and magic! ✨🦄
Ingredients You’ll Need to Make the Perfect Unicorn Cake
Essential Cake Ingredients
The foundation of any great Unicorn Cake starts with high-quality cake ingredients. While the decorating and frosting are what give the cake its whimsical and magical appearance, the cake itself needs to be fluffy, moist, and delicious. Here’s a breakdown of the essential ingredients you’ll need to create the perfect cake base for your Unicorn Cake:
1. Flour
- All-purpose flour is the standard choice for making a light and tender cake. It provides structure without being too dense, which is perfect for a layered cake like the Unicorn Cake. For a softer texture, some bakers opt for cake flour, which has a lower protein content and produces a finer crumb.
- Tip: Sift the flour before use to ensure no lumps, and to aerate the flour for a lighter cake.
2. Sugar
- Granulated sugar is commonly used in the base recipe for a perfect balance of sweetness. It helps to tenderize the cake and contributes to its moisture.
- Tip: If you want an extra level of sweetness and a finer texture, you can substitute part of the granulated sugar with powdered sugar in the batter.
3. Eggs
- Eggs provide the structure and moisture for your cake. The proteins in eggs help bind the ingredients together, while the yolks add richness.
- Tip: For best results, use room temperature eggs. Cold eggs can cause the batter to curdle, affecting the texture of the cake.
4. Butter
- Unsalted butter adds flavor and moisture to the cake. It also helps with creating a tender crumb. Make sure to soften the butter to room temperature before mixing to achieve the perfect texture.
- Tip: If you’re looking for a slightly richer flavor, you can substitute a small portion of the butter with vegetable oil, which helps the cake stay moist for longer.
5. Baking Powder
- Baking powder is the leavening agent that helps the cake rise and become fluffy. It’s a must-have ingredient for light, airy cake layers.
- Tip: Always check the expiration date of your baking powder to ensure it’s still active and will give you the desired rise.
6. Milk
- Milk adds moisture and helps to achieve a smooth batter. It’s the key to getting the perfect cake texture that’s not too dry or dense.
- Tip: You can use whole milk for a richer flavor, or substitute with non-dairy milk like almond or soy milk if you prefer a dairy-free version.
7. Vanilla Extract
- A splash of vanilla extract enhances the flavor profile of the cake, making it fragrant and delicious without overpowering the other flavors.
- Tip: For a more robust vanilla flavor, opt for pure vanilla extract rather than imitation vanilla.
8. Salt
- A pinch of salt brings out the sweetness of the cake and balances the flavors. It also helps to enhance the overall taste of the other ingredients.
- Tip: Don’t skip the salt, even if you’re making a sweet cake. It plays a key role in flavor enhancement.
Optional Add-ins:
- Food Coloring: To create the magical rainbow layers of your Unicorn Cake, gel food coloring is your best friend. Gel colors provide vibrant, bold shades without watering down the batter.
- Vanilla or Almond Extract: Add a dash of almond extract for an extra layer of flavor that complements the vanilla.
With these essential cake ingredients, you’re well on your way to creating the perfect Unicorn Cake base. By using the right ratios and high-quality ingredients, you’ll ensure that your cake is moist, flavorful, and ready to be decorated into a masterpiece!
Unicorn Cake Frosting & Fillings
One of the key elements that make a Unicorn Cake stand out is the frosting and filling. The frosting not only adds flavor but also plays a crucial role in bringing the cake to life with its vibrant colors and smooth texture. Here’s how you can elevate your Unicorn Cake frosting and fillings:
1. Buttercream Frosting
- Why Buttercream?
Buttercream is one of the most popular frosting choices for unicorn cakes due to its smooth consistency and ability to hold color well. It’s versatile, easy to work with, and can be piped into beautiful swirls, rosettes, and borders. The richness of buttercream complements the lightness of the cake layers, making it the perfect base for your unicorn design. - How to Make Buttercream
To make a basic American buttercream, you’ll need unsalted butter, powdered sugar, vanilla extract, and a little bit of milk. Beat the butter until it’s light and fluffy, then gradually add the powdered sugar, a splash of vanilla, and milk to achieve a spreadable consistency. If you want to create different colors, simply divide the frosting into portions and add gel food coloring for bold, vivid hues.
2. Whipped Cream Filling
- Light and Fluffy
Whipped cream can be used as a filling in between the layers of your unicorn cake for a lighter, airier texture. Its subtle sweetness pairs perfectly with rich, colorful buttercream frosting. - How to Make Whipped Cream Filling
To make a stable whipped cream filling, you’ll need heavy cream, powdered sugar, and a small amount of vanilla extract. Whip the cream until it forms stiff peaks, and add the powdered sugar and vanilla to taste. For added stability, you can mix in a little whipped cream stabilizer or gelatin to help it hold up between the layers without wilting.
3. Raspberry Jam or Fruit Fillings
- Tart and Sweet
Adding a fruity filling, such as raspberry jam or a mixed berry compote, can bring a refreshing contrast to the richness of the cake and frosting. A thin layer of seedless raspberry jam between the cake layers adds a burst of flavor that pairs wonderfully with the sweetness of buttercream. - How to Use Fruit Fillings
Simply spread a thin layer of jam or fruit compote over each cake layer before applying frosting. Make sure the filling is not too runny to avoid soggy layers. If you prefer a fresher taste, you can also make a homemade fruit filling by cooking down fresh berries with sugar and lemon juice until it thickens.
4. Cream Cheese Frosting
- Tart and Rich
If you want a slightly tangy flavor that balances the sweetness of the buttercream, cream cheese frosting is a great option. It’s thicker and slightly less sweet than buttercream but still smooth and spreadable. Cream cheese frosting pairs particularly well with fruit-filled cakes and is perfect for adding a unique twist to your unicorn cake. - How to Make Cream Cheese Frosting
To make cream cheese frosting, combine cream cheese, unsalted butter, powdered sugar, and vanilla extract. Beat everything together until smooth. This frosting can be tinted to match the unicorn theme and can also be piped into delicate designs.
5. Combining the Frosting and Fillings
- Layering Techniques
When assembling your unicorn cake, the combination of frosting and filling is crucial to achieving the right balance of sweetness and texture. Begin by applying a thin crumb coat of frosting to seal in the crumbs. Afterward, add a layer of fruit filling (if desired) followed by a generous amount of frosting. Continue layering and frosting the cake until you have reached your desired height. - Smooth Finish or Textured Swirls?
Once your cake layers are stacked and filled, you can either go for a smooth, sleek finish or use the frosting to create whimsical swirls and textures. For a smooth look, use an offset spatula to spread the frosting evenly, then scrape the sides to create sharp edges. If you prefer a textured design, use a piping bag and a star tip to create soft swirls of frosting, or even rainbow rosettes to reflect the magical unicorn theme.
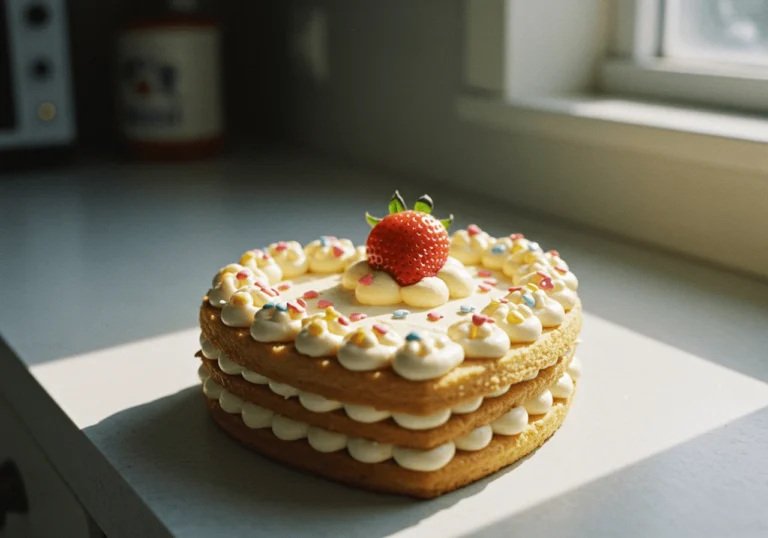
By choosing the right frosting and fillings for your unicorn cake, you’ll be able to achieve the perfect balance of flavor and visual appeal. The layers of buttercream, fruit fillings, and whipped cream create a cake that is as delicious as it is beautiful, capturing the magical essence of a unicorn in every bite! 🌈🦄
Decorating Supplies for Your Unicorn Cake
Decorating a Unicorn Cake is where the fun truly begins! To achieve that magical, colorful, and whimsical look, you’ll need the right tools and supplies. These supplies will help you add the details that make the cake stand out and capture the enchanting spirit of a unicorn. Here’s a breakdown of the essential decorating supplies you’ll need to bring your unicorn cake to life:
1. Piping Bags and Nozzles
- Piping bags are a must-have for applying frosting to your cake in different shapes and designs. You can use disposable or reusable bags depending on your preference.
- Pair your piping bags with a variety of piping nozzles (tips) to create different textures and effects. For example:
- Star tip (for rosettes or ruffles)
- Round tip (for smooth, fine lines)
- Petal tip (for flower-like designs)
- Piping is key for making things like the fluffy mane, the cake’s borders, or decorative swirls around the unicorn’s face.
2. Fondant
- Fondant is essential for creating the unicorn’s horn, ears, and any other decorative elements like flowers or bows. Fondant gives a smooth, polished finish and can be molded into various shapes easily.
- You can either use store-bought fondant (available in a variety of colors) or make your own.
- Pastel colors like pink, purple, and light blue work well for a magical theme, but you can also opt for more vibrant colors for a bolder look.
3. Edible Glitter and Dust
- Edible glitter or shimmer dust adds an ethereal touch to your unicorn cake. Lightly dust the top or sides of the cake for a sparkling effect that mimics the magic of unicorns.
- Gold or silver edible glitter is especially popular for the unicorn horn, giving it that extra shine.
- Pearl dust or luster dust can be used for a more subtle shine, perfect for creating a dreamy, soft effect on the cake’s layers or decorations.
4. Rainbow Sprinkles
- Rainbow sprinkles are a fun and vibrant way to add color to your unicorn cake. You can sprinkle them generously on the sides or top of the cake to create a rainbow effect or a festive border.
- Unicorn-shaped sprinkles or star-shaped sprinkles are also great additions for a theme that fits the magical aesthetic.
5. Food Coloring
- Gel food coloring is ideal for creating vibrant, rich colors for your cake’s layers, frosting, and decorations. Unlike liquid food coloring, gel gives you more control and doesn’t alter the consistency of your frosting.
- You can use multiple colors to create a rainbow effect in your frosting or to color fondant for the unicorn’s mane and ears.
- Popular choices for unicorn cakes include pastel pink, lavender, mint green, baby blue, and buttercup yellow. Mixing these colors gives you the variety and fantasy effect you’re aiming for.
6. Cake Dowels or Supports
- If you plan to make a multi-layered unicorn cake, you’ll need cake dowels or other forms of cake supports to ensure your layers are stable and don’t collapse under the weight of frosting or decorations.
- These are particularly important if you want to achieve a towering, impressive look with a lot of detail.
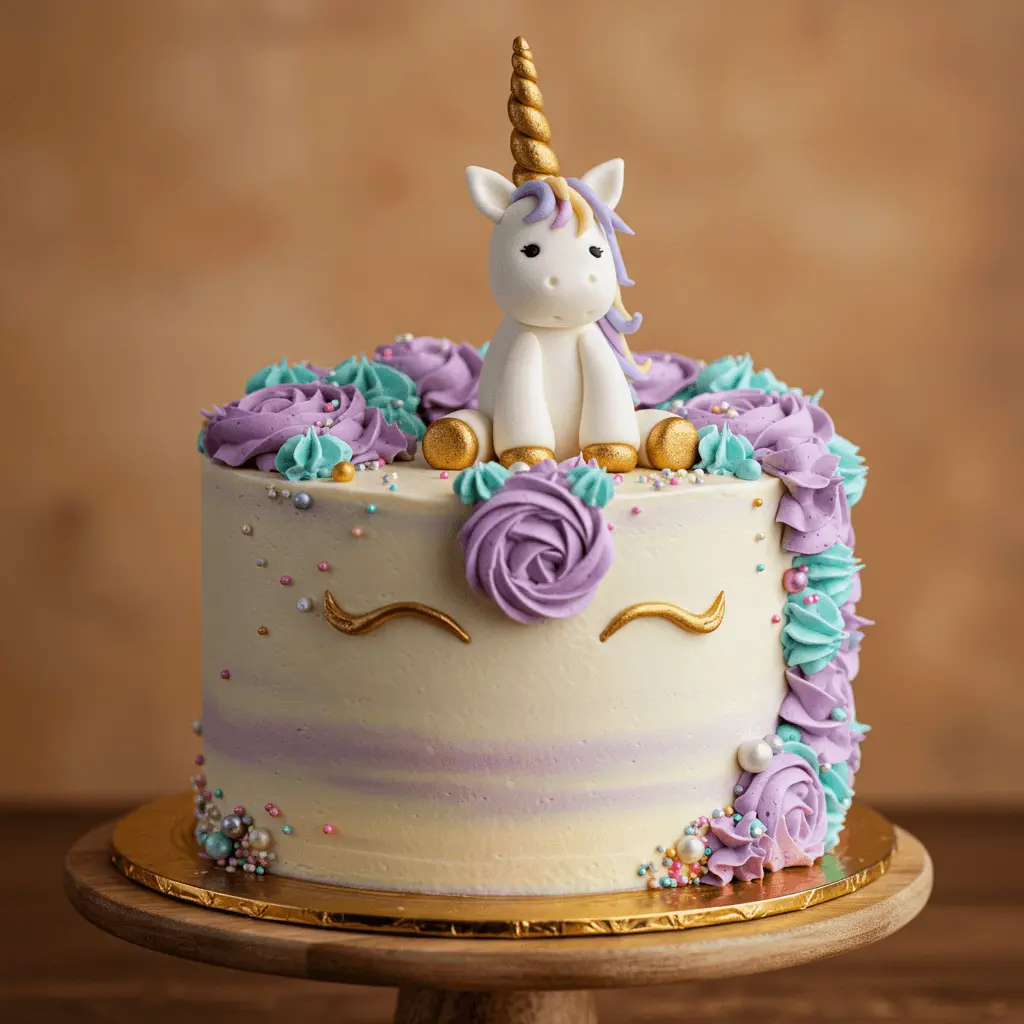
7. Unicorn Cake Topper (Optional)
- For an even more whimsical touch, you can add a unicorn cake topper. These are often pre-made decorations in the shape of unicorn heads, complete with horns, ears, and even faces. You can find these at baking stores or online.
- If you prefer a DIY approach, you can make a topper from fondant or edible clay, molding it into a detailed unicorn shape for the cake’s center.
8. Turntable or Cake Stand
- A turntable makes decorating much easier, especially when you’re smoothing frosting or piping intricate designs. It allows you to rotate the cake while keeping your hands steady, giving you more control over the decorating process.
- A decorative cake stand will elevate the presentation of your unicorn cake and make it look even more magical during the event.
9. Silicone Molds
- If you want to create specific, intricate shapes like unicorn ears, flowers, or other decorative elements, silicone molds can be incredibly helpful. You can press fondant or chocolate into the molds to make beautiful, uniform decorations quickly and easily.
Step-by-Step Guide to Making a Unicorn Cake
Preparing the Cake Layers
The cake layers are the foundation of your Unicorn Cake, and preparing them properly is crucial to creating a delicious and visually appealing dessert. Here’s a detailed guide on how to prepare the perfect layers for your unicorn cake:
1. Choose the Right Cake Recipe
The first step in preparing your cake layers is selecting a recipe that will hold up well during assembly and decoration. A classic sponge cake or a vanilla butter cake is ideal, as it has a light, airy texture that pairs well with the rich frosting and vibrant colors of a unicorn cake. If you’re looking for something a little different, a rainbow cake base made from colored layers can add extra visual appeal.
2. Prepare Your Cake Pans
Before mixing your ingredients, grease your cake pans generously with butter or non-stick spray, and line the bottoms with parchment paper. This ensures that your cake layers come out of the pans easily without sticking. If you’re planning on creating multiple layers (which is typical for a unicorn cake), you’ll want to divide the batter evenly across several pans to create distinct cake layers.
3. Mix the Batter
Follow your cake recipe’s instructions to mix the batter. Be sure to measure your ingredients accurately to ensure the perfect texture. For a moist cake, use room temperature ingredients like butter, eggs, and milk. Mix the wet and dry ingredients separately before combining them gently to avoid overworking the batter, which could result in a dense cake.
For added fluffiness, consider adding baking powder or baking soda depending on the recipe. This will help the cake rise evenly, ensuring light and airy layers that hold up well under the weight of frosting.
4. Add Color to the Cake Layers
A key feature of a unicorn cake is its vibrant colors, and you can incorporate this into your cake layers. Once your batter is ready, divide it evenly into bowls. Using gel food coloring (which gives a more intense and stable color than liquid food coloring), add a few drops of different colors to each bowl. Popular colors for a unicorn cake include pastel pinks, purples, blues, and yellows.
If you’re going for a rainbow effect, layer the colors in the pans in a swirl pattern. You can either spoon the different colored batters into the pans one by one or swirl them gently with a spatula for a marbled effect.
5. Baking the Layers
Set your oven to the recommended temperature, typically around 350°F (175°C). Once the oven is hot, bake your cake layers for the amount of time indicated in the recipe (typically 25-30 minutes). Monitor the cake closely and test for doneness by inserting a toothpick into the center. If it comes out clean, the cake is done and ready to be removed from the oven.
If you’re baking multiple layers at once, make sure to rotate the pans halfway through the baking time to ensure even cooking. Allow the cakes to cool in the pans for approximately 10 minutes before moving them to a wire rack to cool completely.
6. Level the Cake Layers
Once your cake layers have cooled, it’s time to level them. Using a serrated knife or a cake leveler, trim the tops of the cakes so they are flat and even. This ensures that your unicorn cake layers stack neatly without tilting. Leveling also helps the frosting adhere better and creates a more professional-looking finished cake.
7. Prepare for Assembly
Once your cake layers are ready, you’re all set to start assembling the unicorn cake! Depending on the design you’re going for, you might want to add a thin layer of frosting or jam between the layers for added flavor and moisture.
With the cake layers prepared and leveled, you’re now ready to move on to frosting and decorating your Unicorn Cake! Follow the next steps in the guide to achieve that beautiful and magical final look.
Coloring the Cake Layers and Frosting
One of the most exciting parts of making a Unicorn Cake is adding vibrant colors to the layers and frosting. This not only brings the magical theme to life but also enhances the overall look of your cake. Here’s how you can achieve stunning colors for both your cake layers and frosting:
Coloring the Cake Layers
To create a rainbow effect inside your cake, you’ll need to separate the cake batter into multiple bowls. Each bowl will be colored a different shade to create the vibrant layers. Here’s how to do it:
- Prepare the cake batter: Follow your chosen recipe to prepare the cake batter. Once it’s mixed and smooth, divide it into separate bowls based on how many colors you want in your cake (typically 4-5 colors works well).
- Add food coloring: Use gel food coloring or liquid food coloring to achieve the desired shades. Start with a small amount of color and add more if needed. Gel coloring is recommended since it provides vibrant hues without watering down the batter.
- For a soft pastel look, use just a small drop of color.
- For bright, bold colors, add a few more drops.
- Mix thoroughly: Stir the food coloring into each bowl of batter until the color is fully blended. Make sure the colors are bright and even for the best visual effect.
- Layer the colored batter: Start by spooning one color into the center of your prepared cake pan. Then, add the next color on top, but don’t mix them together. Let the batter spread naturally. Repeat with all the colors, layering them in a circular fashion. When you cut into the cake, you’ll get a stunning rainbow effect.
Coloring the Frosting
The frosting on a Unicorn Cake is just as important as the cake itself. It should be colorful, fluffy, and vibrant to match the theme. Here’s how to color your frosting for the best results:
- Make your frosting base: Start by making your buttercream frosting or whipped cream frosting—these are the most commonly used types for unicorn cakes. Once the frosting is made, divide it into separate bowls, just like you did with the cake batter.
- Add the colors: Use gel food coloring to color your frosting. You’ll want to pick shades that are often associated with unicorns—think pastel pinks, purples, blues, and yellows. Add the coloring in small amounts, mixing it in completely before adding more until you achieve the desired hue.
- For a swirled look, consider using different colors in a piping bag. Simply add different colors of frosting into the same piping bag and pipe the frosting directly onto the cake in swirls or rosettes.
- Create the ombre effect: If you want to go for a more subtle, layered effect, you can create an ombre look with the frosting. Begin with the lightest shade at the bottom of the cake, and gradually transition to darker shades as you move up. This technique can add depth and a magical touch to your unicorn design.
Tips for Perfectly Colored Layers and Frosting
- Test the colors: Before committing to coloring the whole batch, test a small amount of batter or frosting with the food coloring to ensure it’s the shade you desire.
- Avoid overmixing: When coloring both the cake and frosting, be sure not to overmix the batter or frosting after adding the color. Overmixing can lead to a denser texture and reduce the vibrancy of the colors.
- Use high-quality food coloring: Opt for gel food coloring as it produces more vibrant colors without changing the texture of the cake or frosting. Avoid liquid food coloring as it can dilute the batter and frosting.
Assembling the Cake
Once you’ve baked and cooled your unicorn cake layers, it’s time to bring everything together to create a magical, colorful masterpiece! Assembling a unicorn cake requires patience, precision, and a little bit of creativity. Here’s how to do it step-by-step:
1. Prepare Your Workstation
Before assembling, make sure your workspace is clean and organized. Have everything you need within reach:
- Cake layers
- Buttercream frosting (or any frosting of your choice)
- Piping bags and tips
- Fondant decorations (ears, horn)
- Edible glitter or sprinkles
- Turntable (optional but useful for smooth frosting)
2. Level and Trim the Cake Layers
Ensure your cake layers are even by leveling them. Use a serrated knife to trim off any uneven tops. This will help your layers stack neatly and stay stable. If the layers have domed a bit in the center during baking, it’s important to cut those parts off to get a flat surface for frosting.
3. Frost the First Layer
Place your first cake layer on your cake board or stand. If you’re using a turntable, it’ll make frosting easier. Begin by spreading a thin layer of buttercream (or whatever frosting you’ve chosen) on top of the first layer. Use a bench scraper or offset spatula to spread it evenly.
4. Add the Second Layer
Set the second cake layer on top of the first. Lightly press down to ensure the layers stick together, but be careful not to squish the cake. Add another layer of frosting and smooth it out just like the first.
5. Add the Third Layer and Frost
Repeat the process with your final cake layer, pressing gently to ensure a good seal. Now it’s time for the crumb coat, which helps seal in any loose crumbs before applying the final, smooth layer of frosting. Apply a thin layer of frosting all over the cake to lock in the crumbs, then refrigerate the cake for 20-30 minutes to let the crumb coat set.
6. Apply the Final Coat of Frosting
Once the crumb coat is set, apply a thicker layer of frosting over the entire cake. Use an offset spatula or cake scraper to smooth the frosting evenly. This layer should be smooth and flawless, as it serves as the base for your decorations. You can opt for a smooth finish or a more textured one, depending on your design.
7. Add Colorful Layers of Frosting
Here’s where the fun begins! Divide your frosting into several bowls and color each one with different shades, such as pastel pinks, blues, purples, and yellows—classic unicorn colors. Using a piping bag, pipe swirls, rosettes, or small borders around the cake to create a magical rainbow effect. You can also use a piping nozzle to create rosettes or other fun shapes.
8. Attach the Unicorn Decorations
Now for the real magic: the unicorn features!
- Unicorn Horn: Shape the horn out of gold-colored fondant and place it in the center at the top of the cake. You can also add some edible glitter for extra sparkle.
- Ears: Create small, rounded ears using white fondant, and add a small pink fondant piece to the center for the inner ear. Attach the ears next to the horn at the top of the cake.
- Eyes and Mane: If you want to add eyes or a mane, you can use additional fondant, piping gel, or even candy pieces to complete the unicorn’s face and colorful mane.
9. Add the Final Touches
To make your unicorn cake even more magical, sprinkle edible glitter, rainbow sprinkles, and sparkling sugar on top. You can also add small sugar flowers or other decorative items to enhance the look. Don’t be afraid to get creative here—the more whimsical, the better!
10. Chill and Serve
Once assembled, refrigerate the cake for about 30 minutes to allow everything to set in place. This will help the frosting firm up and prevent any decorations from sliding off. When you’re ready to serve, remove the cake from the fridge, slice, and watch your guests’ eyes light up!
Assembling the cake might take some time, but the result will be worth every effort. A beautiful, delicious Unicorn Cake that not only looks magical but tastes just as amazing! 🌈🦄
Final Touches and Unicorn Details
The final touches are what truly bring your Unicorn Cake to life and make it an eye-catching showstopper. After you’ve stacked and frosted the cake layers, it’s time to get creative and add those magical details that will transform your cake into a real-life unicorn. Here’s how to perfect the finishing touches:
1. Creating the Unicorn Horn
The iconic unicorn horn is the centerpiece of your cake, so getting it right is essential for a magical finish.
- Materials: You can craft the horn from fondant, gumpaste, or even ice cream cones. Fondant is the most common and easiest to work with.
- How to Make It: Roll the fondant into a long, thin cone shape. Twist it gently to form a spiral pattern. You can also dust it with edible glitter or gold luster dust for extra sparkle. If you’re using an ice cream cone, simply cover it with a layer of fondant, and optionally paint it with edible gold or silver paint.
- Placement: Place the horn gently in the center of the top layer of the cake, making sure it’s secure and won’t topple over. You can even prop it up with a bit of frosting to keep it stable.
2. Shaping the Unicorn Ears
Next, you’ll want to create unicorn ears that are both adorable and realistic.
- Materials: Use fondant or gumpaste for the ears. You’ll also need a small amount of pink fondant for the inner ear details.
- How to Make Them: Roll small pieces of white fondant into teardrop shapes for the outer ear, and then flatten the top a bit. For the inner ear, cut a smaller pink oval and place it inside the white ear shape.
- Placement: Position the ears on each side of the unicorn horn, slightly tilted for a natural look. If needed, use a small amount of frosting or edible glue to secure them in place.
3. Adding the Unicorn Mane
The unicorn’s mane adds a burst of color and whimsy to your cake. You can create a flowing mane using buttercream or fondant ribbons.
- Buttercream Mane: Use a piping bag with a star tip to create textured curls or waves of buttercream along the top and sides of the cake. You can color the buttercream in a variety of pastel shades like pink, purple, blue, and yellow to mimic a rainbow mane.
- Fondant Mane: If you prefer a more structured look, you can create strips of fondant and place them in flowing waves, layering them on the cake. You can also roll the fondant into small balls or teardrop shapes to make individual “locks” of hair.
- Placement: Start the mane at the base of the unicorn horn and let it cascade down one side of the cake, adding layers of color as you go. For extra flair, pipe small buttercream flowers or sprinkles into the mane.
4. Edible Glitter and Decorations
To give your unicorn cake that extra sparkle, edible glitter and sprinkles are the finishing touches that can make your cake shine.
- Edible Glitter: Lightly dust the unicorn horn, ears, and mane with edible glitter or luster dust for a magical, shimmering effect. You can also dust the outer edges of the cake to give it a radiant look.
- Sprinkles: Add colorful rainbow sprinkles, confetti, or even silver stars around the top or sides of the cake. These small touches enhance the cake’s whimsical feel and make it more fun and festive.
5. Final Presentation
Now that your unicorn cake is complete, the presentation is key to showcasing all the effort you’ve put in.
- Cake Stand or Plate: Place your cake on a decorative cake stand or a simple white plate for a sleek and elegant look. A sparkly or themed cake stand can really elevate the magic.
- Additional Decorations: You can surround the base of the cake with extra rainbow-colored macaroons, candy pearls, or cake pops for a coordinated dessert table. If you’re serving it at a birthday party, consider adding a “Happy Birthday” topper or other cute signs that match the unicorn theme.
Creative Decorating Ideas for Your Unicorn Cake
Rainbow Cake Designs
Creating a rainbow cake effect in your Unicorn Cake is one of the most exciting and visually striking elements of the design. The burst of bright colors not only adds a fun, playful element but also aligns perfectly with the magical unicorn theme. Here’s how you can incorporate rainbow designs into your cake layers and frosting to give it that enchanting look:
1. Rainbow Layered Cake
- One of the easiest and most vibrant ways to add a rainbow effect to your Unicorn Cake is by incorporating multi-colored cake layers. This involves dividing the cake batter into multiple bowls and adding different food coloring to each one. You can use gel food coloring for more vibrant, concentrated colors.Steps:
- Divide the batter into separate bowls—each for a different color (red, orange, yellow, green, blue, indigo, and violet).
- Layer the colors in your cake pans, starting with one color at the bottom and carefully adding the next on top of it. You can either swirl the colors together for a marbled effect or layer them neatly for defined stripes.
- Bake the layers and let them cool completely before stacking them.
2. Rainbow Ombre Effect
- If you want a subtler yet still striking rainbow effect, try the ombre technique. This involves creating a gradient of colors in your cake’s frosting, from one shade to another.Steps:
- Prepare your frosting and divide it into several bowls. Mix different amounts of food coloring in each bowl, starting with the darkest shade and gradually lightening the color for each successive bowl.
- Apply the frosting layer by layer, starting with the darkest shade at the bottom of the cake and gradually fading to the lighter shades at the top.
- Use a spatula or bench scraper to smooth out the layers, creating a beautiful transition between colors.
3. Rainbow Swirl Buttercream
- Swirled rainbow buttercream is a fun and eye-catching way to decorate the outer layers of your Unicorn Cake. It gives the cake a swirling, marbled effect that mimics the magical movement of a unicorn’s mane.Steps:
- Prepare your buttercream and divide it into separate bowls, each with a different color.
- Using a piping bag, add each colored frosting side by side (don’t mix them), then insert the piping bag into a clean bag with a star tip or round tip.
- Pipe the frosting onto the sides of the cake in a swirling motion, creating a vibrant spiral of colors around the cake’s surface.
- Blend the colors slightly if you want a smoother transition, or leave them more distinct for a bold rainbow effect.
4. Rainbow Sprinkles & Edible Glitter Accents
- Adding rainbow sprinkles to your unicorn cake enhances the playful feel and reinforces the bright colors. You can scatter them on the sides of the cake or create a colorful border.Tip: For a more magical look, dust the top of the cake with edible glitter or shimmer dust. This will add a touch of sparkle, making your cake look extra special and giving it the illusion of a mystical unicorn aura.
5. Rainbow Fondant Decorations
- If you’re working with fondant for your unicorn cake decorations, you can also use it to create rainbow patterns. Roll out different colors of fondant and cut them into shapes like strips, circles, or stars to place on the cake.Steps:
- Roll out fondant in various colors, and cut out thin strips.
- Layer the fondant strips on the sides of your cake or arrange them in patterns, such as a rainbow stripe that cascades down the side of the cake.
By combining these rainbow techniques, you’ll create a magical unicorn cake that is not only visually stunning but also fun and playful, fitting perfectly with the whimsical theme of your celebration. Don’t be afraid to get creative with the patterns and colors—after all, unicorns are all about embracing a world of vibrant imagination! 🌈✨
Adding Edible Glitter and Sprinkles
One of the most enchanting elements of a Unicorn Cake is its magical sparkle. Edible glitter and sprinkles are perfect for giving your cake that whimsical, fairy-tale finish. These shiny accents help elevate the cake’s vibrant colors, adding dimension and visual appeal. Here’s how you can use them to make your unicorn cake even more dazzling:
- Choosing the Right Edible Glitter
Edible glitter comes in a variety of finishes: holographic, metallic, or fine. For a Unicorn Cake, opt for iridescent or rainbow glitter to enhance the magical, colorful theme. You can find edible glitter in various colors, from gold and silver to pastel hues like pink, purple, and blue—ideal for complementing the cake’s rainbow layers. - Applying Glitter to the Cake
After covering your cake in buttercream or fondant, lightly dust the glitter over the top of the cake or around the edges. You can use a small sifter or paintbrush to gently apply the glitter to avoid clumping. To add extra sparkle, you can also sprinkle glitter onto specific areas like the unicorn’s horn or the sides of the cake, giving it a magical glowing effect. - Choosing the Right Sprinkles
Sprinkles come in an array of colors, shapes, and sizes. For a Unicorn Cake, consider using rainbow sprinkles, star-shaped sprinkles, or even edible pearls for a more elegant touch. Choose sprinkles that complement the cake’s color scheme and don’t overpower the glitter or other decorations. - Where to Apply the Sprinkles
Once the glitter is applied, you can place sprinkles on the cake’s top surface or around the edges for a fun, festive vibe. If you’re using unicorn-themed sprinkles, consider adding them around the cake’s base or even inside the layers to surprise your guests when they cut into the cake. Edible stars or hearts work especially well when you want to create a magical, dreamy effect. - Balance and Subtlety
While glitter and sprinkles are fun and festive, it’s important to strike a balance between elegance and whimsy. Don’t overdo it! Sometimes, a light sprinkle of glitter on the top or scattered sprinkles around the edges is enough to create a beautifully magical look without overwhelming the cake’s overall design.
By carefully adding edible glitter and sprinkles, you’ll bring a touch of magic to your Unicorn Cake that will surely impress your guests. These small details are what transform a simple cake into a whimsical, showstopping centerpiece for any celebration! 🌟
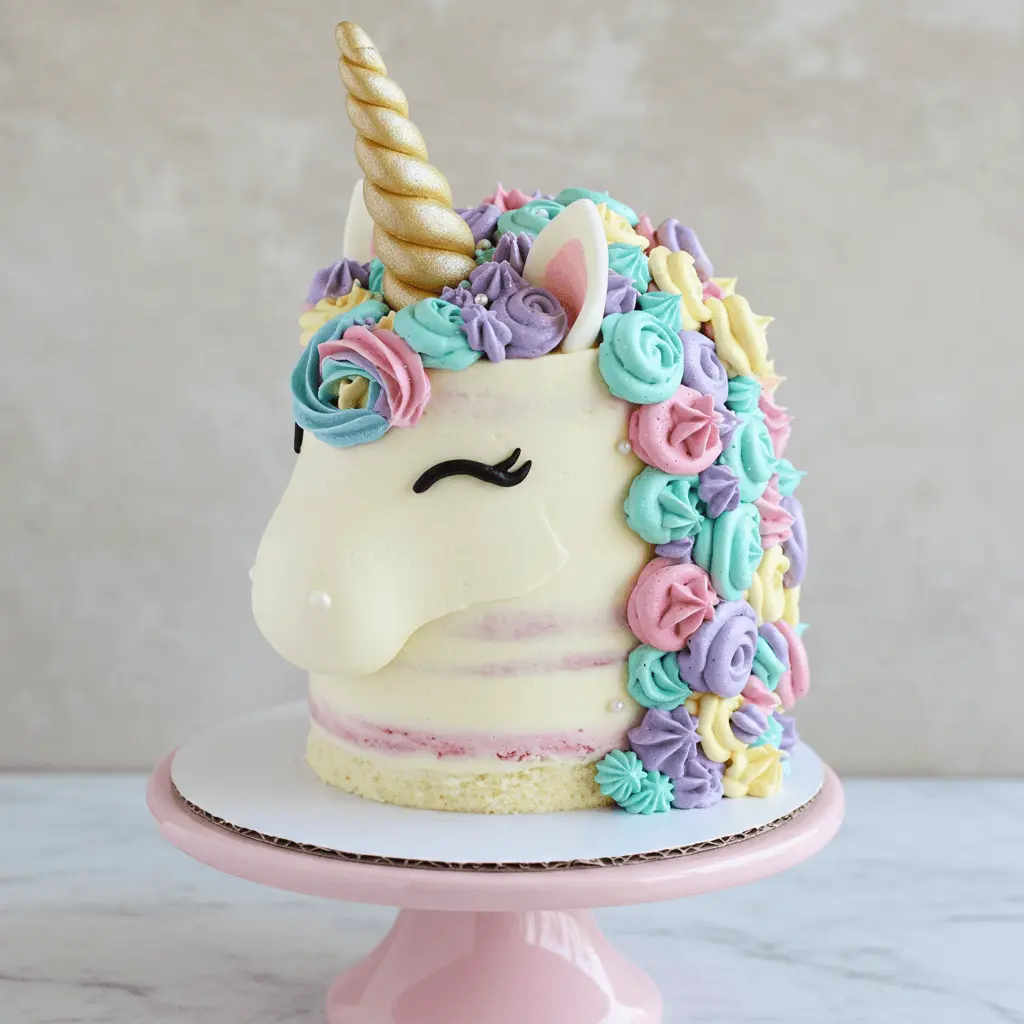
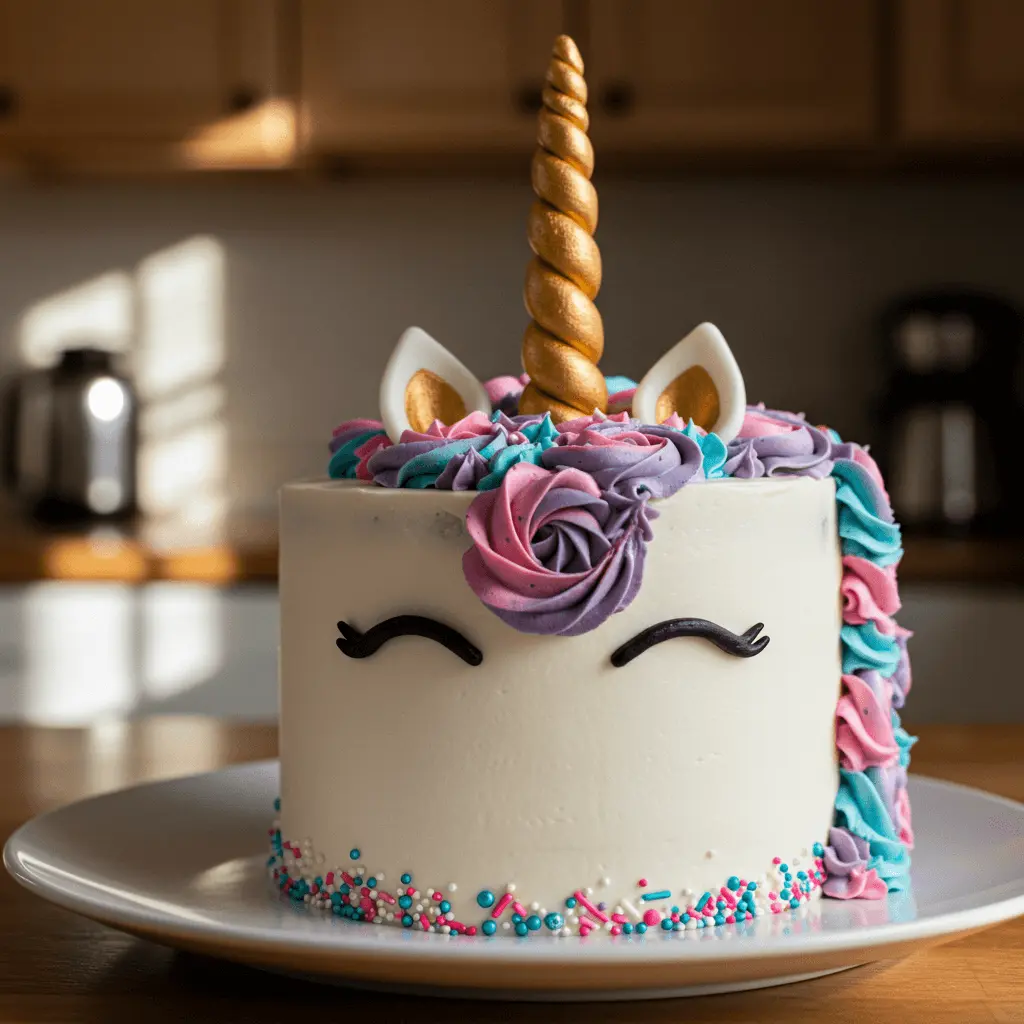
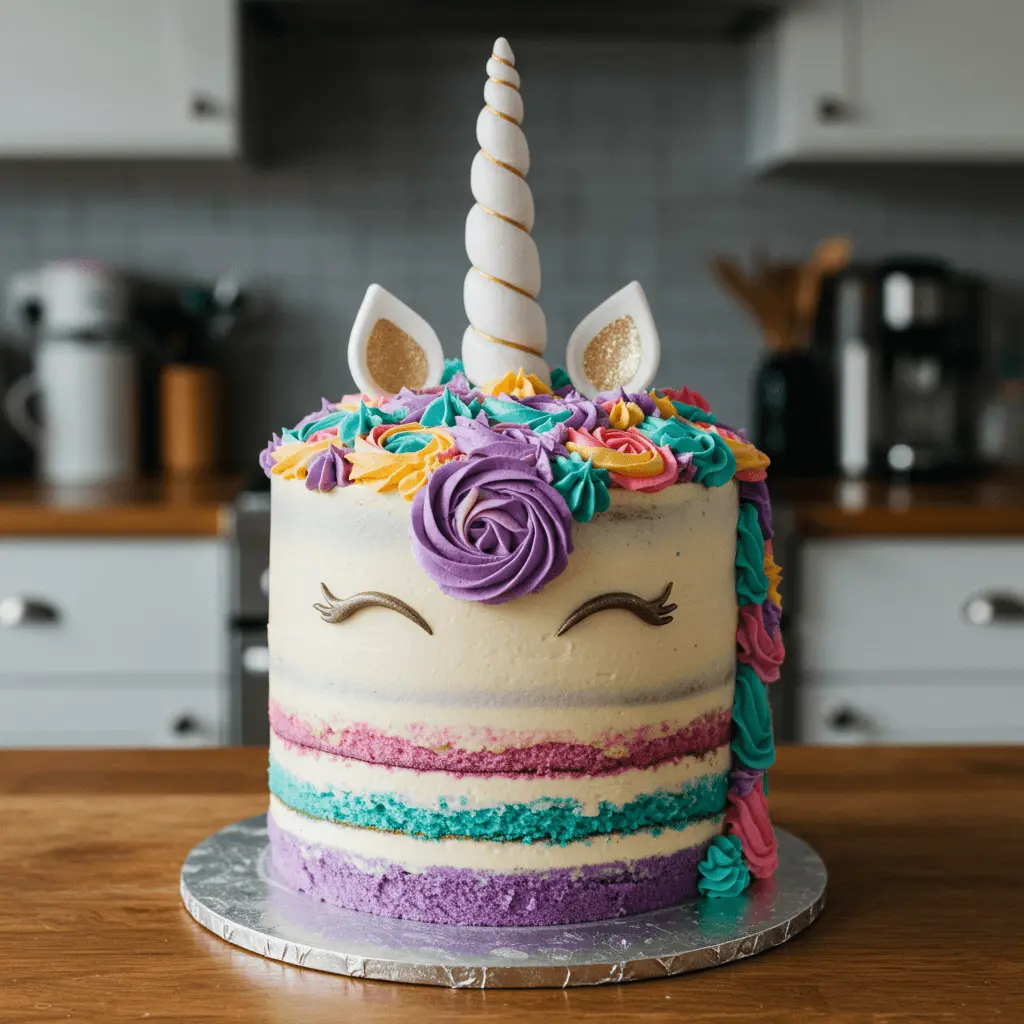
Unicorn Cake Horns and Ears
One of the most iconic features of a Unicorn Cake is its magical horn and ears. These decorations help transform your cake into a true unicorn, making it not only delicious but also visually stunning. Crafting the perfect unicorn horn and ears can be a fun and creative process, and with a few simple tips, you can make them look both realistic and whimsical.
Creating the Unicorn Horn
The unicorn horn is the centerpiece of the cake’s design, and it should be both sturdy and visually striking. Here are a few methods to make a beautiful unicorn horn:
- Fondant Unicorn Horn:
- Roll out a piece of gold or white fondant into a long, thin cone shape. Start with a wider base and taper it toward the top to create the cone-like shape of a horn.
- Once you have the basic shape, twist it gently to add texture. You can also use a toothpick to create subtle spirals by gently running it up the length of the horn.
- Once shaped, place it in the fridge to firm up, ensuring it holds its shape when placed on top of the cake. You can dust the finished horn with edible glitter or gold dust to make it shimmer and look even more magical.
- Sugar Cone Horn:
- If you’re looking for a quicker, more child-friendly option, you can use a sugar cone (like the ones used for ice cream) as the base for the horn.
- Simply cover it with fondant or buttercream, using a smooth, gentle motion. You can also decorate it with sprinkles or edible glitter to make it shine. The sugar cone is lightweight and easy to work with, making it perfect for beginners.
Making the Unicorn Ears
Unicorn ears are another important detail in bringing the magical creature to life on your cake. Here’s how to make them:
- Fondant Ears:
- Roll out some white fondant and cut out two simple oval shapes for the ear bases. Use your hands or a tool to gently shape them into an ear-like form.
- For the inner part of the ears, use pink fondant or a light peach color. Cut smaller ovals and stick them inside the larger white ovals. You can add a little edible glue or water to help them stick.
- For added texture, use a small brush to lightly score lines on the fondant ears, mimicking the soft folds of a unicorn’s ears.
- Alternative Ears (Buttercream):
- If you prefer a buttercream approach, pipe two large ear shapes using a star tip or petal tip to create the base. You can fill the inside of the ears with piped pink buttercream to replicate the inner ear details.
- Add some soft detailing on the edges using a small spatula to give the ears a more natural, curved appearance.
Attaching the Horn and Ears
Once your unicorn horn and ears are ready, it’s time to attach them to your cake. Here’s how:
- Positioning the Horn:
- The unicorn horn should be centered at the top of the cake, slightly tilted to one side for a more natural appearance. You can use a little buttercream or fondant glue to secure it in place. If you’re using a sugar cone horn, it’s essential to insert a skewer or dowel rod into the center for extra stability.
- Placing the Ears:
- Position the ears just below the horn, slightly angled outward. Secure them with a small dab of buttercream or edible glue. If your ears are heavy, you might need to use a toothpick to hold them in place temporarily until the buttercream hardens.
Tips for a Successful Unicorn Cake
How to Achieve Perfect Layers and Texture
Creating the perfect layers and texture for your Unicorn Cake is essential to not only make it look stunning but also ensure it’s delicious and easy to cut. Here are the key steps to achieving fluffy, even layers with the right texture:
- Choose the Right Cake Recipe
The foundation of any great cake starts with the recipe. For a unicorn cake, it’s crucial to select a moist and light cake recipe. A basic sponge cake, vanilla cake, or even a fun rainbow cake will work well. Ensure the recipe has the right balance of ingredients—too much flour can make the cake dense, while too much liquid may make it soggy. - Accurate Measurements
Precision is key when it comes to achieving the right texture. Use a kitchen scale for the most accurate measurements of ingredients like flour, sugar, and butter. Over-mixing the batter can lead to a tough cake, so be sure to mix just until combined, and avoid over-beating the eggs to prevent a dense crumb. - Room Temperature Ingredients
Bring your butter, eggs, and other dairy ingredients to room temperature before mixing them together. Cold ingredients can cause the batter to curdle, affecting the texture. Room temperature ingredients blend more evenly, ensuring a smoother batter and lighter texture. - Divide the Cake Batter Evenly
When you’re baking multiple layers for your unicorn cake, it’s important to divide the batter evenly among your cake pans. For consistent layers, you can use a kitchen scale to measure the batter in each pan or simply eyeball it, but make sure each pan holds an equal amount. This ensures the cake layers bake evenly and are the same height when stacked. - Bake at the Right Temperature
Preheat your oven to the correct temperature, typically 350°F (175°C) for most cake recipes. Check the accuracy of your oven’s temperature with an oven thermometer. Bake the cakes for the recommended time, but always do a toothpick test to check if the cake is fully cooked. Insert a toothpick into the center, and if it comes out clean or with just a few crumbs, the cake is ready. - Let the Cakes Cool Completely
After removing the cakes from the oven, let them cool in the pans for about 10 minutes. This helps the cakes firm up and makes it easier to remove them without breaking. Then, carefully turn the cakes out onto a wire rack and allow them to cool completely before assembling or frosting. If the cakes are warm, the frosting may melt or slide off, and the layers could become uneven. - Trim the Cake Layers
Once the cakes are fully cooled, use a serrated knife to trim the tops of each layer, creating a flat, even surface. This will prevent the layers from being uneven or wobbly when stacked, ensuring a perfect finished look. If the cake layers are too domed, cutting off a thin slice will help create a smooth, level surface for the frosting. - Use the Right Frosting
To achieve a smooth, even texture when stacking the cake, choose a stiff buttercream that holds its shape well. Frosting should be spread evenly between the layers, and the outer layer should be smooth to allow for the perfect fondant or buttercream decoration. You can even use a cake scraper to get a polished, professional finish on the outer layer.
Troubleshooting Common Cake Decorating Issues
Decorating a Unicorn Cake can be a fun and rewarding experience, but sometimes things don’t go as planned. Don’t worry, though! Here are some common cake decorating issues you might face and tips on how to troubleshoot them to ensure your unicorn cake looks magical.
1. Frosting Slipping or Melting
One of the most common issues when decorating cakes is frosting that starts to slide off or melt. This can happen if the cake or frosting is too warm.
Solution:
- Chill your cake: After frosting the cake, place it in the fridge for at least 30 minutes before decorating. This will help the frosting set and prevent it from sliding off.
- Use thicker frosting: If your frosting is too soft, try adding more powdered sugar or refrigerating it before using it to ensure it holds its shape.
- Use a crumb coat: Apply a thin layer of frosting to seal in the crumbs, then refrigerate the cake. Once it’s chilled, add the final coat of frosting.
2. Uneven Layers or Cake Tiers
If your cake layers aren’t even or they start to lean to one side, it can affect the final look.
Solution:
- Level the cake layers: After baking, use a serrated knife or a cake leveler to trim off the dome-shaped top of each layer to make them even. This ensures the layers stack properly.
- Support with dowels: If you’re making a multi-tier unicorn cake, use cake dowels or straws to support each tier and prevent it from leaning.
3. Fondant Cracking or Drying Out
Fondant is a fantastic way to achieve smooth, flawless finishes, but it can sometimes crack or dry out during decorating.
Solution:
- Use fresh fondant: If your fondant is too dry, knead it with a bit of shortening or water to bring it back to a smooth and pliable texture.
- Don’t roll it too thin: Thin fondant can tear easily, so try rolling it out thick enough to cover the cake without it becoming fragile.
- Keep fondant covered: While working with fondant, keep it covered with plastic wrap or a damp towel to prevent it from drying out.
4. Crumbly or Dry Cake Layers
If your cake layers are too dry or crumbly, they may be hard to frost and assemble, leading to a less-than-perfect unicorn cake.
Solution:
- Measure your ingredients carefully: Too much flour or not enough liquid can lead to dry cake layers. Make sure to measure ingredients precisely.
- Use buttermilk or sour cream: These ingredients can help add moisture and tenderness to your cake layers.
- Don’t overbake: Keep an eye on your cake while it’s baking, and do the toothpick test (insert a toothpick into the center; it should come out clean but not too dry). Overbaking dries out cakes, making them difficult to decorate.
5. Streaky or Patchy Frosting
Sometimes, you may notice streaks or patches in your frosting, especially when you’re trying to achieve a smooth surface for the unicorn cake.
Solution:
- Use a hot spatula: For smoother frosting, dip a spatula in hot water, dry it, and then run it gently over the surface of the cake. This helps smooth out the frosting and eliminates streaks.
- Use a frosting smoother: You can also use a frosting smoother or bench scraper to achieve a flawless finish by gently scraping away any uneven areas.
6. Decorations Not Sticking
When decorating your unicorn cake with fondant elements (like the unicorn horn or ears), you might find that they aren’t sticking properly.
Solution:
- Use edible glue: Edible glue is a simple solution for securing fondant decorations. You can buy it or make your own using a mixture of water and gum paste.
- Apply a little frosting: If you don’t have edible glue, a small dab of buttercream frosting works great to attach fondant decorations to the cake.
7. Too Much or Too Little Color in the Cake or Frosting
Achieving the perfect color palette for your unicorn cake can be tricky. You might end up with frosting that’s too bright or too pale.
Solution:
- Use gel food coloring: Gel food coloring is much more concentrated than liquid, so it gives more vibrant colors without watering down your frosting.
- Mix small amounts at a time: Start with a small amount of color and gradually add more until you achieve the shade you want. This gives you better control over the final color.
- Mix thoroughly: Be sure to fully incorporate the food coloring to avoid streaks or uneven color in your cake or frosting.
8. Cake Crumbling When Cutting
When cutting into your unicorn cake, you may encounter crumbling if it wasn’t properly baked or cooled.
Solution:
- Allow the cake to cool completely: Let your cake cool in the pan for about 10 minutes, then transfer it to a wire rack to cool completely before frosting and cutting.
- Use a serrated knife: A serrated knife works best for cutting through cakes without causing them to crumble or tear.
Storing and Serving Your Unicorn Cake
Once you’ve created your stunning Unicorn Cake, it’s important to know how to store and serve it properly to maintain its freshness and keep it looking as magical as possible. Here’s everything you need to know:
Storing Your Unicorn Cake
- Refrigeration vs. Room Temperature:
If your unicorn cake contains dairy-based fillings like buttercream or whipped cream, it’s essential to refrigerate it to prevent spoilage. However, if it’s purely decorated with fondant and doesn’t have perishable ingredients, you can keep it at room temperature for up to a day or two. - Covering the Cake:
To preserve the marzipan or fondant decorations and prevent the cake from drying out, cover it with a large cake dome or an airtight cake box. If you’re using fondant, wrapping the cake loosely in plastic wrap before placing it in the dome can help maintain the texture. - Long-Term Storage:
If you need to store the cake for a longer period, you can freeze it. Slice the cake into individual portions, wrap each slice in plastic wrap, and place them in a freezer-safe container. For whole cakes, freeze them without frosting first, then thaw and decorate before serving. - Frosting Preservation:
If you made extra frosting for decorating, store it separately in an airtight container in the fridge. Before reusing, give it a quick whip to bring back its fluffy texture.
Serving Your Unicorn Cake
- Presentation:
When it’s time to serve your unicorn cake, presentation matters. If your cake has been refrigerated, let it sit out at room temperature for about 30 minutes before serving. This ensures the frosting and layers are at their best texture and flavor. - Cutting the Cake:
Because Unicorn Cakes tend to have multiple colorful layers and delicate decorations, cut the cake with a serrated knife to avoid messing up the design. Use a gentle sawing motion and be careful around the fondant decorations so they stay intact. - Serving Portions:
Since unicorn cakes can be quite rich and indulgent, serving smaller slices is a great idea. Make sure to give each slice a little extra sparkle by sprinkling some edible glitter or a few rainbow sprinkles for that extra magical touch. - Pairing with Drinks:
To balance the sweetness of the cake, serve it with a light tea or fruit juice. A chilled glass of milk or a sparkling lemonade also complements the whimsical nature of the cake perfectly.